When you’re first starting out on guitar (or even if you’ve been playing a while!), bar chords can be difficult. You need a certain amount of finger and hand strength to create a clear sound. If you’re looking for easy bar chords, you may not find any that are particularly easy. However, learning the basic shapes of several chords will help you play a large number of chords. In addition, good technique can help ease the pain of playing this type of chord.
What Exactly Is a Bar Chord?
A bar chord or barre chord is one where you place your finger across the width of the fretboard, holding multiple strings down at once. Then, you’ll use your other fingers to press down strings further down the fret. This type of chord is in contrast to an open chord, where you just use your fingertips to hold down strings.
Memorizing the Main Shapes
Many bar chords use four basic shapes, E major, E minor, A major, and A minor. The fact that there are only four shapes you need to know right away can seem a little confusing since you likely know that bar chords come in every key. However, once you learn the basic shapes, you move the shape up and down the fret to change the key.
Learn the E Major Bar Shape
Place your index finger across the first fret, covering all the strings at once. Put the tip of your middle finger on the G string on the second fret. On the third fret, use your ring finger on the A string and your pinkie on the D string. Try to apply even pressure with your index finger across the strings while pressing down each of the other strings with your fingertips. Pluck the strings individually to see if you’re getting a clear sound from each one and adjust as needed.
Though this bar chord is called the “E” shape, it actually makes F major when your index finger is on the first fret. It’s called the “E” shape because it’s the shape you make in an open E chord when starting on the first fret with your middle finger, ring finger, and pinkie without holding down all the strings. In that case, it’s as if the zero fret, the one on the head, is making the “bar” on the E.
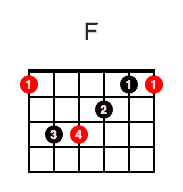
Figure Out the E Minor Bar Shape
This chord is similar to the E shape. However, instead of using four fingers, you’re only going to use three. Place your index finger across the fretboard on the first fret, covering all the strings like you did with the E shape. Put your ring finger on the A string on the third fret and your pinkie below that on the D string. This formation and fret location makes the F minor bar chord. Make sure each string is sounding as you apply even pressure.

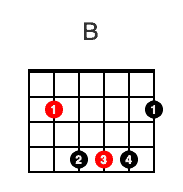
Make the A Major Bar Shape
With this shape, place your index finger across the second fret, covering all the strings at once. Use your ring finger to press down the bottom three strings on the fourth fret. However, with this chord, don’t play the top string (the low E string) when you strum, or the chord won’t sound right. Check to make sure each string is making a clear sound. This shape makes the B major bar chord on these frets. If this bar chord doesn’t work for you, you can use your other three fingers to hold down the D, G, and B strings.

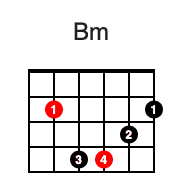
Create the A Minor Bar Shape
Hold your index finger across the fretboard on the second fret. Use your middle finger to press down the B string on the third fret. On the fourth fret, use your ring finger on the D string and your pinkie on the G string. Apply even pressure across all the strings, and then pluck each string to check for even sound. This bar shape makes the B minor bar chord.
Move the Shapes around to Make Other Chords
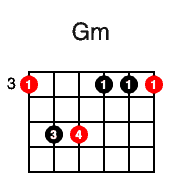
Once you learn these basic shapes, you’ll find you understand the basics of most bar chords. You simply have to move these shapes around to different frets to get other chords. For example, if you move the E minor shape to where your index finger is on the third fret, you’ve got G minor. Check bar chord charts to learn different chords you can play with these shapes!
Making Bar Chords Easier
Apply Even Pressure across the Strings.
When you’re using your index finger to go across the fretboard, it can be tempting to press harder on one end or the other. However, it’s important to apply even pressure so that you don’t injure your hand or finger by over-stressing it in one place.
Move Your Index Finger around to See What’s Most Comfortable.
It’s natural to place your index finger, so the tip goes to the top of the fretboard. However, you don’t have to use that placement. The tip can extend past the fretboard if that’s more comfortable for you. Move your finger up and down to see what’s most comfortable and makes it the easiest to apply even pressure to the strings.
Play Partial Bar Chords as Needed.
A partial bar chord is when you don’t go all the way across the strings with your index finger. With this type of chord, you won’t play all the strings, which makes it easier to play. If you think that will change your sound, you’re right! However, in some cases, that can be beneficial for the song you’re playing. Try the chord as a partial and full bar chord to see which one sounds best.
Check the Action on Your Strings.
The “action” is how far your strings are off your fretboard. If they’re too high off the board, you need to hold the strings down with more pressure, making bar chords more difficult. If you think your strings may be too high, take your guitar to your local music shop to have them adjust your action. Most of the time, they can lower it for you.
Bar chords can be difficult to master at first, which is probably why you want to know some easy bar chords. Keep in mind, it can take a little while to build up the hand strength you need to play these chords properly! In the meantime, use some of these techniques to make them easier, and you’ll be playing them faster than you think.
If you want to learn more about bar shapes, then read our article about the CAGED-System.

