Are you having trouble with your tube amp? If you’re a guitar player, you know how frustrating it can be when your amp isn’t working properly. You might be thinking that your amp is beyond repair, but don’t give up hope just yet! In this article, we’ll take you through the steps of troubleshooting your tube amp and get it back up and running in no time. Whether you’re a beginner or a more experienced player, you’ll find helpful tips and advice to get your amp sounding the way it should. So, if your tube amp isn’t working properly, read on and get ready to rock!
Common causes of tube amp problems
Tube amplifiers are widely beloved for their warm and vintage sound, but they do need proper care and maintenance for functioning optimally. Unfortunately, there are several issues that may arise with tube amps and end up affecting the overall performance of the tube amp. It is important to know about the common causes of tube amp problems to resolve them efficiently and be able to enjoy the best possible sound from the tube amp. Here are some of the common causes of tube amp problems that you might experience –
#1. Blown tubes
One of the most common issues with tube amps is blown tubes. Over time, the tubes could wear out or fail because of extended use or power surges. Symptoms of blown tubes in a tube amp include distorted or weak sound, excessive noise, loss of volume, or complete loss of audio output. You will need to identify the faulty tubes by visually inspecting them or by using a tube tester. After that, replace the blown tube with a new, properly matched tube for restoring optimal performance.
#2. Loose connections
Loose connections could cause intermittent or no sound output from the tube amp. Movement, vibrations, or improper handling could result in loose connections between the cables, connectors, or internal components. You need to inspect all the cable connections, speaker connections, input/output jacks, and more. Make sure that they are securely plugged in and tightened. If needed, you should clean the connections and make use of a contact cleaner for eliminating any oxidation or dirt that might be affecting the signal.
>>> Click here to read our review about the Top 15 Best Tube Amps <<<
#3. Dirty contacts
Dirty contacts can often cause crackling sounds, intermittent audio, or signal loss in tube amps. Over time, dirt, dust, and oxidation could accumulate on volume knobs, switches, potentiometers, and other electrical contacts. You should regularly be cleaning these components using electronic contact cleaner spray and contact cleaner. Gently rotate the knobs and switches when applying the cleaner to dislodge any dirt or oxidation. Then wipe away any access and make sure that the contacts are dry before testing the amp.
#4. Power supply issues
Power supply issues can often affect the overall performance of the tube amp. Insufficient or fluctuating power can result in low volume, distortion, or a complete loss of output. You need to check the power cord and make sure that it is securely plugged into a reliable source. Further, inspect it for potential signs of damage, if you suspect any power issues, make sure that you consult a qualified technician. A technician will have the expertise to examine and repair the internal power supply components like capacitors or rectifier tubes.
#5. Overheating
A tube amp will generate heat when functioning. If the tube amp is not properly managed, excessive heat could lead to various overheating problems. Dust accumulation, inadequate ventilation, or faulty cooling fans could result in overheating. Common symptoms of overheating include reduced output, distorted sound, or the amp completely shutting down. You should make sure that there is proper airflow around the amp, clean out any dust or debris from vents and cooling fans, and verify that the fans are operating correctly. You should also consider using external fans or cooling systems for any additional heat dissipation if necessary.
#6. Environmental factors
Environmental conditions can also greatly affect the performance of tube amps. Extreme temperatures, high humidity, and exposure to moisture can result in corrosion or damage to internal components. You must keep your tube amp in a suitable environment with stable temperatures and controlled humidity. Further, you should be protecting it from direct sunlight, excessive dust, liquids, and other external elements.

How do you troubleshoot a tube amp that isn’t working?
Despite tube amps being one of the most popular types of guitar amps, they come with their negatives. These powerful musical devices can succumb to various issues over time, which is why you must maintain them properly. When your amp is facing any issues and not performing as expected, it’ll be important that you troubleshoot the tube amp systematically. But how do you troubleshoot a tube amp that isn’t working? Here, you will get to know the process of troubleshooting the tube amp and resolving common issues that might be hampering the performance –
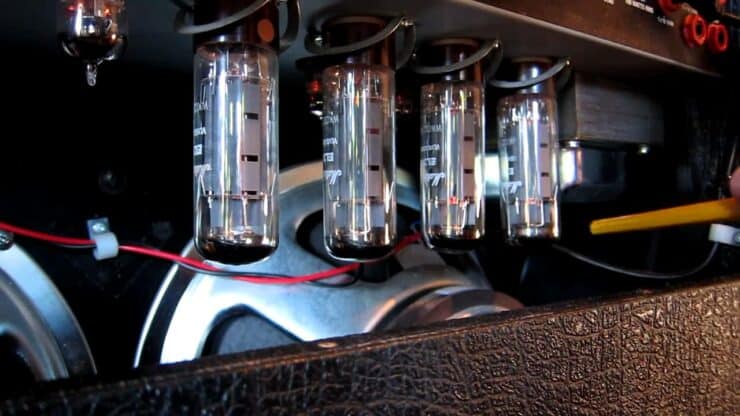
#1. Checking tubes
Begin by inspecting the tubes, as they are the most important components of a tube amp. Be on the lookout for signs of tube failure, such as cracks, discoloration, or a white powdery substance on the tube glass. You need to gently tap every single tube with a pencil while the tube amp is on so that you can listen for any microphonic noises. If you notice any abnormalities like distorted sound or low output, you will have to replace the suspect tube with a properly matched replacement. Make sure that you follow proper handling and biasing procedures when you are installing new tubes.
#2. Checking connections
Loose or faulty connections could result in intermittent or no sound output. You should start by examining all the cable connections, input/output jacks, and speaker connections. Make sure that they are firmly seated and tightened. Further, you should pay special attention to the guitar cable and speaker connections, as they are quite prone to accidental tugs or looseness. If you find any loose connections, secure them properly so that you can ensure a stable electrical signal.
#2. Cleaning contacts
Dirty contacts could result in crackling sounds, intermittent audio, or signal loss in a tube amp. Begin by turning off and unplugging the tube amp. Make use of a contact cleaner or electronic contact cleaner spray for cleaning potentiometers, switches, and any other electrical contacts. Then, you need to apply the cleaner to the contacts while gently rotating the knobs or toggling switches to dislodge any dirt or oxidation. Wipe away any excess cleaner and make sure that the contacts are completely dry before you power up the amp again.
#3. Test the power supply
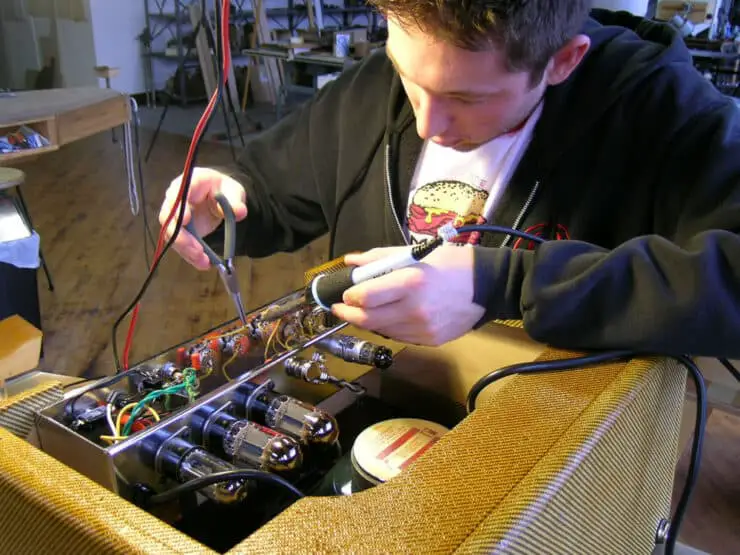
A faulty power supply can greatly impact the performance of a tube amp. Start off by verifying that the power cord is plugged securely into a reliable power source. Then, you need to inspect the power cord for any signs of damage or fraying and replace it if needed. You should also check for the internal power supply components such as capacitors and rectifier tubes, while also checking for signs of failure or damage. In case you suspect any power supply issues, it is advisable that you consult a qualified technician to perform in-depth testing and repairs.
#4. Test for performance issues
Once you have addressed these steps, you will have to power on the amp and systematically test its performance. Start off with low-volume settings and gradually increase the volume while playing a clean signal. Listen for any unusual noises, dropouts, or distortion in the audio. Test every channel and any effect or features separately to make sure that they are functioning properly. If you notice any persistent issues, you must consult a professional for further diagnosis and repair.
How to replace a faulty tube in a tube amp?
Once you know the common issues that might cause problems with your tube amp, you will be able to troubleshoot them with ease. However, there might be instances where your amp’s tubes are beyond repair. In this situation, you will have no option but to replace the faulty tubes in your tube amp. If you are not certain how to replace a faulty tube in a tube amp, then here are the step-by-step instructions. By following these steps, you will be able to replace the tube efficiently and keep your amp in top shape –
Step 1: Identify the type of tube
You will need to refer to your tube amp’s manual or consult the manufacturer’s website for determining the specific type of tube your amp uses. Some of the common types of tubes in a tube amp include preamp tubes (such as ECC83 or 12AX7) and power tubes (such as 6L6 or EL34). You will also need to take note of the tube’s pin configuration and electrical specifications to ensure capability with the amp.
Step 2: Prepare for tube replacement
- First, you should switch off and unplug your tube amp
- Then, allow the amp to cool down for a sufficient amount of time to avoid any risk of burns
- Gather the necessary tools and equipment for tube replacement, including gloves, tissue paper or cloth, and a tube socket key or soft cloth to handle the tubes
Step 3: Remove the old tube
Locate the tube that you want to replace within the tube amp. Tubes are typically positioned vertically and seated in a tube socket. You must grasp the base of the tube gently using gloves or a soft cloth to prevent oils or dirt from contacting the tube surface. Moreover, you should carefully wiggle the tube back and forth while pulling it straight out of the tube socket. Then, you should place it on a clean surface such as a cloth or tissue paper to avoid any damage.
Step 4: Install the new tube
Take the new tube, making sure that it matches the type and specifications required for your amp. Position the tube over the tube socket, aligning the pins with the corresponding holes in the socket. You should then insert the tube into the socket while applying gentle pressure until it is fully seated. You must be careful that you do not force the tube, as it will slide in smoothly. Wiggle the tube slightly for ensuring a secure connection and proper contact with the tube socket pins. Double-check that the new tube is inserted correctly and securely.
Step 5: Testing and finalizing
- Plug in and power on the tube amp
- Allow the amp to warm up for a few minutes before you test the new tube
- Gradually increase the volume and play different sounds to verify that the new tube is functioning properly
- Listen for any distortions, fluctuations in volume, or abnormal noise
- If everything sounds good, then know that you have successfully replaced the tube in your tube amp
How to reset and test the tube amp?
Resetting a tube amp is extremely beneficial when you encounter performance issues or simply want to restore it to its default settings. Whether you are experiencing sound inconsistencies or wish to start fresh with your amp’s settings, performing a reset on the tube amp can greatly help. Here are the step-by-step instructions on how to reset a tube amp and ensure that you can enjoy optimal performance and tonal quality –
Step 1: Power off and unplug
Before you perform any maintenance or adjustments, you should switch off the tube amp and unplug it from the power source. Allow the amp to cool down for a few minutes to prevent potential hazards and avoid any accidental burns.
Step 2: Reset the controls
Locate the control knobs on the tube amp, including volume, gain, tone, and any other adjustable parameters. After that, you should set all the control knobs to their minimal or zero positions. This will ensure a neutral starting point for the reset. If the amp has any switchable options, such as channel selection or effects, you need to turn them off or set them to their default settings.
Step 3: Tube check
Now, you will need to carefully inspect the tubes for potential signs of damage or discoloration, such as cracks, dark spots, or a white powdery substance. Make sure that the tubes in the tube amp are securely seated in the sockets. You should gently push them down if necessary to ensure proper contact.
Step 4: Power up and warm up
You need to plug in the amp and then power it on. Allow the tubes in the tube amp to warm up for a few minutes. This process will allow the tubes to reach their optimal operating temperature and stabilize their performance.
Step 5: Adjust the settings
Consult the amp’s user manual or manufacturer’s instructions for identifying the default settings for our specific model. You need to make proper adjustments to the settings based on the recommended default values. This typically involves adjusting the tone controls, gain levels, and any other adjustable parameters.
Step 6: Tone and EQ check
Now, you will have to adjust the tone controls (i.e. bass, treble, and mid) to their neutral or flat positions. Play different musical passages across different frequency ranges. Listen for any irregularities in the tone, such as muddiness, excessive brightness, or harshness.
Step 7: Effects and connectivity test
If your amp comes with built-in effects or an effects loop, you must test each effect and verify that they are functioning properly. Then, you’ll need to connect the external devices (such as pedals and loopers) and test the compatibility and connectivity with the amp.
Step 8: Volume and gain check
Gradually continue increasing the volume and gain settings to higher levels. Monitor the amp’s response and listen for unwanted noise, signal distortion, or excessive feedback.
Step 9: Final sound test
- Play your guitar through the tube amp using various playing techniques and styles
- Evaluate the overall sound quality, dynamics, and responsiveness of the amp
- Note any specific issues or concerns that may require further attention
Step 10: Fine-tune the amp
Once you have reset your tube amp, it will be time to fine-tune the settings as per your preferences. You should gradually adjust the control knobs to achieve the desired sound and response. Further, you should take note of specific settings that work well with your guitar and playing style.
Do tube amps require regular maintenance?
Tube amps, like any other refined instruments and machines, require regular maintenance to make sure proper performance and prevent failures, just as you would when you change your car or bike’s oil.
The tubes in tube amps become crystallized as a result of the frequency of incandescent light. With these amps, the voltages are much higher than in solid-state amps, which causes the caps to fail faster. Over time, a faulty electrolytic capacitor could ultimately fail. You may also want to clean the potentiometer with this type of cleaner regularly. These are hand-wired amps constructed with quality components. Most of the modern consumer-grade snap-together amps will likely fail sooner than today’s models. An electrolytic cap’s life expectancy is generally believed to be 15 years. Tubes that last a long time or the ones that fail unexpectedly will do this regularly.
Understanding the right way how vacuum tubes work and how to care for them will be an important aspect of vacuum tube operation. Vacuum tubes are quite heavy and fragile, so it’ll be critical to store the tubes safely and use them slowly. Tubes that are kept in a closet can last forever. You will likely get 5 to 10 years of regular practicing in a room or studio if you do it a few times per week. Vacuum tubes are generally capable of lasting 500 to 1,000 hours, so if you need to spend 2–3 hours per day using the amp, you can expect to keep the vacuum tubes in proper working order for a year or less. Vacuum tubes will be an investment, but they play a key role in your guitar’s sound and feel.
How long do tube amps last?
Even though tube amps are more fragile than other types of amps, they can still last between 3,000 and 5,000 hours. If you’re playing with your tube amp for 2–3 hours per day, you will be able to expect or extract almost a year from the vacuum tubes. You should also consider how long you intend on playing the music and how loud you intend on playing it. If the impedance is correct, you’ll cause the power tubes to strain and wear down quicker.
FAQs
What are some common problems with tube amps?
Common problems with tube amps include blown tubes, faulty wiring, weak or intermittent sound, hum or buzz from the speakers, and crackling or distorted sound. These issues can be caused by a variety of factors, such as improper connections, worn out components, or a malfunctioning power supply.
What should I do if my tube amp isn’t working?
If your tube amp isn’t working, the first step is to identify the source of the problem. Check for loose connections or worn out components, and make sure the power supply is functioning properly. If you are unable to find the source of the problem, you may need to consult a professional.
How can I prevent problems with my tube amp?
To prevent problems with your tube amp, make sure to keep it clean and dust-free and check the connections regularly. You should also replace the tubes regularly and avoid exposing the amp to extreme temperatures or humidity. If you are using a vacuum tube amp, you should also be sure to turn it off after each use to allow it to cool down.

