Have you got a guitar amp that you want to connect to a mixer? If so, then don’t worry because, by the time you’re done reading this article, you’ll be in a position to do so.
Connecting guitar amp to mixer involves unplugging and powering off the devices, inserting the left speaker cable, inserting the plugs on the other end of the mixer, plugging the power cords to the speakers, and checking the connection. You can also connect the guitar amp to a mixer by using a microphone.
In this article, you’ll get to know all about connecting the guitar amp to the mixer using a microphone, a step-by-step guide on how to connect guitar amp to mixer, troubleshooting tips if something goes wrong, and more. Continue reading to know more about what you’re looking for.
Connecting a guitar amp to a mixer using a microphone
In numerous instances, it can be quite necessary to plug your amp into a mixer. When you’re recording the guitar, the mixer will send the sound from the guitar amp into the recording device. When you’re playing a gig, the mixer will function similarly. However, the sound will then be sent to a public address system for the audience to be able to hear. The easiest way of plugging an amp into a mixer will be through the use of a mic. However, you can easily plug it directly into the channel using the direct out too.
Things that you’ll require
- Microphone
- Microphone cable
- Instrument cable
Instructions to use a microphone to connect the guitar amp to the mixer
Turn the two sliders down on the mixing board. This prevents popping or loud noises when connecting the guitar amp to the mixing board for live or studio use. The main sliders will control the input that is being sent to the main outputs of the mixing board.
Set the guitar amps to the sound that you’d like to record or amplify. Plugging the amp will allow you to easily record it or send the sound to a PA system. Set the volume you need alongside various equalization points for the tone. Set the appropriate amount of gain that you’ll use for each channel, as many amps come with multiple channels.
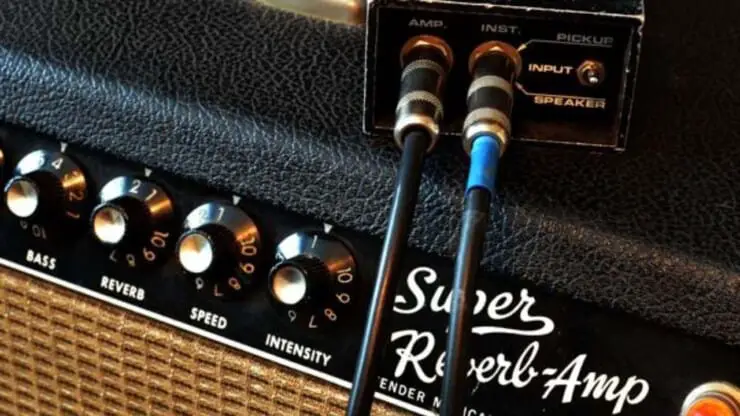
Plug the instrument cable into the direct out output located at the back of the amp. This will send the signal to an external source. Some amps have speaker simulators for use with direct output, but the majority don’t. The direct-out works in a pinch when a mic isn’t available. After that, plug the other end of the cable into the input of the channel on the mixer.
Place a mic in front of one of the speakers on your guitar amp. Plug a microphone cable into the mic and then plug the other end into a channel on the mixer. Use a different channel if you’re using both the mic and the direct out of the amp.
After that, slowly raise the sliders of individual channels or the channel when someone plays the guitar. You should then raise the level until the clip lights on the channels light up on notes that you’re hitting hard. Lower the slider in case the channel is constantly clipping. It’ll let you know that the signals are strong.
Raise the master faders gradually until the sound is strong enough through the PA or in the headphones. You should look for the clipping on the main LEDs too. Ensure that you’re keeping the volume quite high and the sound of the amp clear. Listen for any potential distortion or unwanted noise and make the necessary volume adjustments.
A step-by-step guide to connect a guitar amp to mixers via speakers
If your mixer lacks sufficient power and volume, and you want to fill a room with sound, you’ll need to connect to an amp. Linking your mixer to a guitar amp isn’t a complex process, although it could increase power consumption. Here are the necessary steps to follow when connecting a guitar amp to a mixer using the speakers.
Step 1: Unplug and power off the devices
When you’re connecting two devices, ensure that you unplug and turn off any devices with electrical connections to prevent short-circuit disruption or noise. Then, place the speakers wherever you want them to stand. This will ensure that the speaker cord is straightened and stretched out. Moreover, you can ensure that there isn’t any extra speaker cable coiled up at the bottom right of the speakers.
Step 2: Insert the left speaker cable
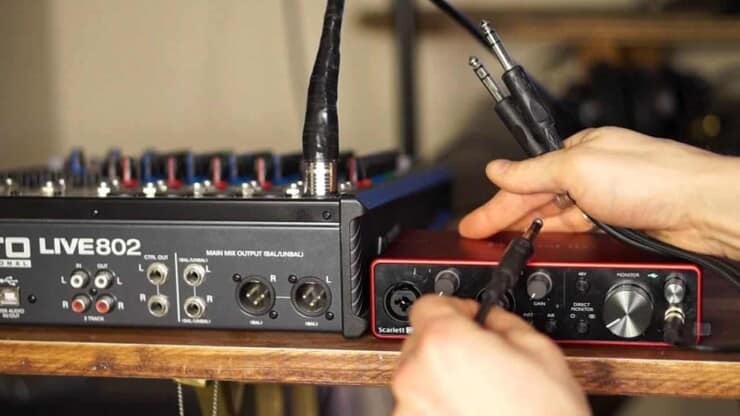
Once you’re done unplugging and shutting off your computer, you’ll have to plug in the left speaker cord. After that, plugin the ends on one of the ends of the speaker cord to the mixer’s out jacks present at the back of the component on the right.
Then, you’ll get to plug the speakers in a way that’ll let you see the “L/Monitor” for one jack and “R/L+R” for the other. You should look for a switch that’ll allow you to choose between using the display and the speakers, or just using the speakers of the mixer.
Step 3: Insert the plug on the other end of the mixer
After that, similar to the second step, plug the plugs on the other end of the mix into the amp in the audio jacks. Moreover, connect the white red speaker cable to the right jack and the white one to the left jack. Once you’ve plugged the cables for the speakers to the speaker’s ends, ensure that you double-check that they’re securely wired.
If you’re connecting the jacks from the mixer to the speakers, you should plug the mixer into the speakers directly. This will connect the amplifier speakers when leaving the display jack on the mixer open for the monitor setup.
In case you’re using a monitor setup, you should connect the cord from the audio mixer to the speakers. In some situations, the line-level from the amp could be directly routed to the speakers. Then, the speaker cables of the right speaker are directly routed to the second stereo output of the left speaker.
Step 4: Plug the power cords to the speakers
After you’ve inserted the plugs on the other end of the mixer, connect the power cords to the speakers. Moreover, plug them into the power supply and then switch on the speakers and the mixer. But first, you should turn on the mixer and the amplifier. Ensure that the levels have been switched down before you turn on the volume output levels control. You can even take advantage of the volume sliders for sound adjustments.
Before you attempt to change the amp’s sound to the appropriate pitch, level, and frequency, look to insert the amp selector knob into one of the audio jacks. Then add that to the driver mixer.
Step 5: Check the connection
Finally, the last step would be to double-check the connection for the soundboard. If your amp is still attached to the speakers and the mixer is having an audio signal flowing, ensure that the sounds it is producing are satisfactory.
Make sure that all the volume settings have been turned down on the CD player and other devices. After that, switch on the mixer and the PA amp, increasing the output level controls gradually. If the amp is connected to the speakers via the right cable and the mixer receives an audio signal through the input, you’ll get an amazing sound quality. You should adjust the volume slightly to check the settings.
Troubleshooting tips when connecting guitar amp to the mixer via speakers
If you’re having issues linking the mixer to the amp after going through the steps, there are fixes for them. There are some key tips and suggestions to troubleshoot the problems away.
- Make sure that all the equipment is switched on. Adjust the volume cable while having the right cable connected to the input and output.
- Check the types of cables and connectors your amp and mixer are having. The cable has to be compatible with your system setup for it to work properly. Moreover, check the ends of the input, output, and cable.
- When using the monitor display, you can easily set the monitor sound independently of your main speakers and mixers.
- Check if the volume levels of the mixer and amp are turned up on your speaker. After that, check the inputs and input channel controls with the headphones in.
- Until you’re attaching or disconnecting from the speaker sound system, keep the mixer switched off.
- Inspect the fuse and circuit breakers, as the link might have cut off the audio and power signal.
- You shouldn’t attempt to use different amps for your amplified speakers as it can cause harm to your speakers.
- Examine the cables between the amp and the mixer to make sure that they’re in the correct positions. Also, the connectors have to be secure for receiving the signal.
- Once you’ve connected your amp to the mixer speakers, get your headphones and check if you’re hearing the sound
- Never try to open the device equipment for diagnosing it, repairing it, or for any other reason. This will end up nulling the warranty or cause equipment loss. Moreover, it could even result in severe electrical shocks or injuries. Always bring your device to a trained specialist if you’re unable to understand what’s wrong.
Connecting your guitar amps to different variations of external speakers
So, you have the perfect mix, everything is balanced, well-placed, and sounds right on your headphones. However, that doesn’t necessarily mean it’ll translate the same on external speakers. So, how can you connect your amp to different variations of external speakers? This is when you’ll have to hook your soundboard to an amp.
Audio mixing boards don’t always have enough power for speakers. If you’re looking to fill a room or reach a bigger audience, you’ll need to use an external power amp. Luckily, connecting the audio board to an amp is easy and straightforward.
Tools and devices that you should use
- 10-channel mixing console
- 1 stereo bus
- Max. 4 mic / 10 line inputs (4 mono and 3 stereo)
- “D-PRE” mic preamps having an inverted Darlington circuit
- 1 AUXX (including FX)
This short tutorial will help you understand how to connect guitar amp to mixer of different variations. You’ll be using any decent basic mixer and an affordable power amp. These instructions can be applied to any decent amplifier.
Variation 1: Connecting guitar amp to powered speakers
In some situations, you might want to use active loudspeakers. These are PA speakers, and they have power amplification built into them. This eliminates the need for using a separate amplifier.
Connecting the audio mixing board to power speakers will be the same as connecting it to an outboard PA amp. The same connectors and cables are used, and the same principles will apply. You’ll then be able to follow the directions to get the same results.
Some people wish to connect their mixer to a guitar amp, but it isn’t normally recommended. The output from the mixing board could be too strong for the amp’s guitar input jack. This results in unexpectedly high, even potentially dangerous volume levels, excess distortion, or damage to your equipment. If your amp has a line-level input, you can use it instead of the main jack. Such a setup wouldn’t give you the same sound quality. It will probably just be monaural (not stereo) and might not offer enough volume.
Variation 2: Connecting your home stereo amp to a mixer
Connecting a home stereo amp to a home stereo amp will be like hooking up the board to a professional PA amp. A home amp will likely use RCA connectors, although higher-end amps might have balanced XLR connectors too.
You should look for an unused line-level input at the back of the amp, like the one for a tape deck or a CD player. You shouldn’t use the phono input as it could cause distortion, unexpectedly loud volumes, or even damage to your equipment. Ensure that the amp’s source selection knob has been set to the right source, and you’ll be good to go. It’s worth noting that a home amp might not always offer sufficient volume. It might not be optimized for professional gear or speakers. While this option does work, it’ll always be better to use a more modest professional amp.
Variation 3: Connect your amps/monitor speakers to the mixer
This option isn’t for the main amplifier and speakers but for the monitor speakers. They’re the ones that you’ll be using to listen to the mix (similar to how you would have with headphones). Everything else will be the same. Instead of the main stereo outputs, you’ll be using the C-R output jacks and changing the volume via the C-R/Phones level control. This will allow you to easily use both main speakers and monitor speakers simultaneously. Moreover, you will be able to change their volumes independently.
What connections to make for connecting the amps to the mixer?
- Connect each mic to the point box
- Connect each snake XLR connector to the mic input XLR connector
- Connect the mixer main output to the picture equalizer input and then join the picture output signal to the home power-amp input signal
If you aren’t setting a graphical equalizer for your speakers, join the mixer master baits to the inputs of the power amp that pushes the speakers.
Helpful suggestions to keep in mind
Better safe
For avoiding any sudden loud noises and popping sounds or avoiding possible damage to the gear, make sure that all the equipment is powered off. Do it before you connect or disconnect anything and the volume controls are all the way down.
When turning your mixer and amp off, remember to turn off the amp first and then turn off the mixer. When powering them back on, you will need to reverse this, turning on the mixer first and then the amp.
Cable salad
When talking about unwanted noises, cables can be a major offender as well. The longer the cable is, the more noise it will pick up. This is why the cables must be kept as short as possible. Use balanced XLR connectors for eliminating noise and prefer keeping the cables away from other gear, electrical wires, and appliances. Keep the cables neat and separate from one another instead of having them heaped up and tangled together. The resulting cable salad can make the signal cleaner, and they will sound much better.
How much power will be needed
There is a simple rule that will let you know how much power the speakers need. This is possible by determining the maximum recommended power and doubling it.
This rule might sound unwise, but as you won’t be clipping the amp or feeding a distorted signal into the speakers, it may prevent damage and the quality of sound will greatly improve.
Adjusting the mix
The sound coming through your speakers in a larger space is substantially different from what you’re hearing on your headphones. Using the equalizer, pan, and channel level controls, make the sound right for the audience and the room. Eventually, you will be able to know how the right mix is sounding through your headphones.
What to do if the guitar amp or mixer doesn’t work?
What if you’ve followed all the instructions but aren’t getting the expected sound? Even the simplest process could go wrong, and finding out the reason can take longer than you thought. For avoiding that, it is important to run through some basic problems that you may encounter.
Ensure that the equipment is turned on, and the volume controls have been turned up at least a bit. It’ll include not only the main mixer and the amp, but the input channel level controls too. Closely listen to your headphones and see if you’re getting any sound there.
If you are getting the sound, check the cables between the amp the mixer, and the amp and the speakers. Ensure that you are connecting them in the right place and that all the connectors are secure.
Properly check the circuit breakers and the fuses. Sometimes, a protection circuit may trip, cutting off the power or audio signal. You could also look to turn off the equipment for a moment and let it reset.
If possible, you should connect the separate pieces to other gear to see if they work properly. Replace the cables with spares if you’re having them. Then, you’ll be able to figure out exactly which piece has been causing the problem.
You shouldn’t open up any electronic equipment and try to fix or diagnose anything for one reason or the other. Doing that will end up voiding the warranty. It could damage the equipment or result in electrical shocks or injuries. If you cannot figure out the source of the problem, consider bringing it to a local technician.
Conclusion
Thank you for reading. Hopefully, now you know a lot more about connecting the guitar amp to a mixer using a microphone, a step-by-step guide on how to connect guitar amp to mixer, troubleshooting tips if something goes wrong, and more. Connecting your guitar amp to the mixer involves unplugging and powering off the devices, inserting the left speaker cable, inserting the plugs on the other end of the mixer, plugging the power cords into the speakers, and checking the connection. There is also an alternate method as you’ll be able to connect the guitar amp to a mixer by using a microphone.
Image Credit:
Images: Aviom, Newcastle Music Studios

