Is your tube amp giving you trouble, and you’re looking to test the tubes for possible issues? If so, then you’re in the right place.
Testing guitar amp tubes is a simple procedure that involves finding out the root of the issue and fixing it. You must first understand why your tubes have gone bad and then diagnose the issue.
In this article, you’ll get to know all about how to test guitar amp tubes, how to tell if an amp tube is bad, how to diagnose the guitar amp tubes, and more. Continue reading to know all the answers that you’re looking for.
Guitar amp tubes giving you trouble?
Nothing can beat the true analog sound of an authentic cranked tube amp. Most guitarists love tube amps due to the harmonic structures and sound of the overdriven amp. The wonderful feeling when you’ve unearthed the sweet spot and the tubes are creating magic, belting out warn tomes. But suddenly, something goes wrong and things don’t sound right anymore. You’ll be left asking yourself how to tell if guitar amp tubes are bad and how to test guitar amp tubes.
>>> Click here to read our review about the Top 15 Best Tube Amps <<<
The problem is, not everyone has the luxury of having a tube tester. This leaves most people in the dark about the amps diagnosis and treatment. Even if you had a tube tester, it isn’t capable of painting a crystal clear picture of the problems. Basically, pre and power tubes are a bunch of fragile components that get concealed in a vacuum-sealed glass chassis. Their length of service will hinge on many factors. Some of them range from the level of maintenance, road travel, wear and tear, vibration from the speaker, and more.
Symptoms for how to tell if an amp tube is bad
The symptoms of bad pre and power tubes are –
- The amp’s overall volume is lower than usual
- Unusual sound is coming from the amp (it could be humming, popping, crackling, or hissing)
- The amp’s tone has degraded, resulting in loss of tonal dynamics
- Individual tubes are glowing dimmer or brighter than others
- The amp isn’t powering on properly
How to tell if guitar amp tubes are bad
For starters, you’d want to identify any visible signs of bad tubes before you book an appointment with a technician. Here are some of the pointers on how to tell if tubes are bad in a guitar amp.
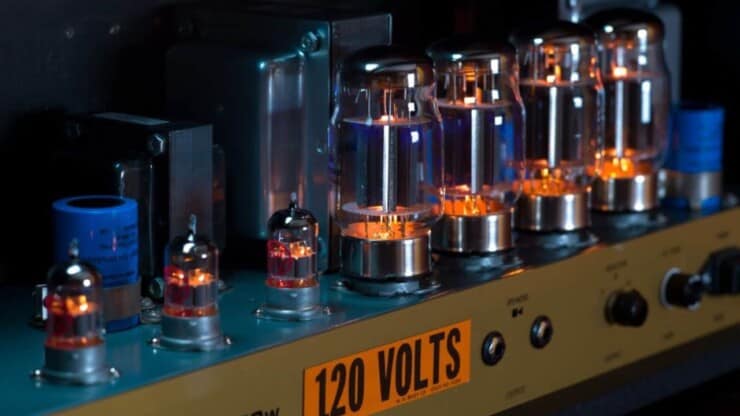
Check the filament glow
Luckily, it’ll be easy to visibly identify what a bad tube looks like without needing a tube tester. Within the tubes, there’s a heater filament and when working optimally, it’ll illuminate with a satisfying warm orange glow. The filaments when glowing will emit electrons at high temperatures that produce heat for the tube, which will be required for maintaining the amp’s optimal tone.
Depending upon the manufacturer, other types glow brighter than others. The main part will be if the filaments are glowing equally and to a decent level. This means that they’re working and passing the first part of the visible test. In case a filament fails to glow, it is referred to as “filament failure” and it’ll need a replacement. If an individual tube glows less brightly than the others, it’ll mean that it is worn down and isn’t functioning optimally, which also needs replacing.
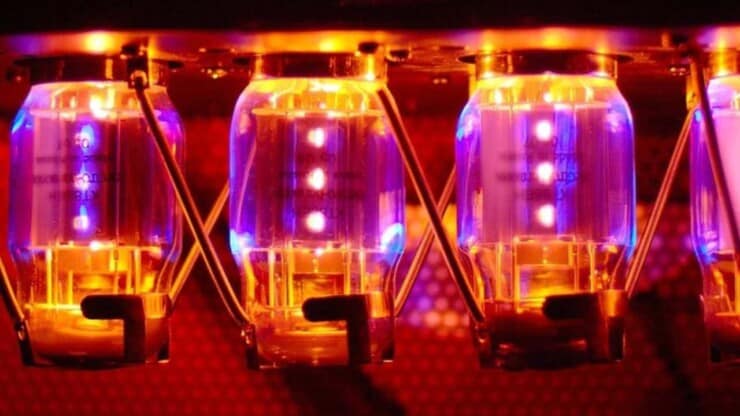
Notice the illumination color of the tubes
Purple glow
A purple or violet glow on the inside of the components looks pretty. However, it’s a clear indication that there’s a leak somewhere in the tube. If spotted, you should replace it immediately before you attempt to use the amp again. For maintaining the optimal function, the tubes will require an airless sealed vacuum. An air leak in the tube will generate positive icons, which causes ionization in the components. Although this might look good, it’s damaging to your amp’s health.
Blue glow
Not to be confused with the purple/violet glow, which is common, a bright blue fluorescent glow will be the opposite. It is a sign that your tubes are healthy. Nothing to fear though, this is a common side effect of a normal functioning tube.
Pink glow
Pink will be a sign that the tubes are having too much gas content in the vacuum. This is caused by excessive grid currents in the components.
Check the getter’s condition
An important aspect that most guitarists overlook with their tubes is constantly checking the condition of the getter. A getter is essentially a silver or light gray metallic material used in sealed systems, including vacuum tubes. They’re positioned near the top housing of the tubes. Moreover, they can also be coated by the side and bottom in other types. The point is that their condition indicates the health of the tubes and reveals potential defects like a slow air leak.
A getter having a silver or gray color will include a healthy tube. It can range from light gray to metallic chrome, which is fine. Remember that a black getter isn’t a burn mark or a hot spot, which many guitarists mistake it for.
There isn’t any need for replacing the tubes. This is basically a by-product of the flash getter. What requires your attention is a getter having a pure white finish. This will be an indication of a leak in the vacuum. If you’ve spotted this, go ahead and replace your critter with a fresh tube.
Look for any red plating
The hot spots or burn marks inside the glass will be a sign of red plating. This happens when the tubes are glowing a constant red even when the tube amps are on standby. This is normally when a power tube is producing excessively much voltage. With that, excessive heat will scorch inside the glass housing. You must immediately replace it with a fresh one, since you’ll be removing the faulty one. It can be caused by a faulty transformer or by other problems with the amp’s circuitry.
Perform the tap test
If your amp tubes appear healthy and pass the visual tests, then it’ll be time to bring out the tap test. Technically, this will be more of an audible test than anything. However, it is still the standard when hunting for the pesky tube that has failed you.
It’s simple. You should take an object like a pen or pencil and tap each individual tube. Carefully listen for any inconsistencies in the sound. A faulty tube is likely to sound duller than other sounds, or it’ll sound as if it has components rattling inside. This is an indication that the amp tube has failed and requires replacement. Remember, it is rare that multiple tubes will need replacing at the same time.
Can bad guitar amp tubes cause volume loss?
The simple answer to that is yes. When a pre or power tube starts weakening, it’ll lose its voltage and performance. This causes a major loss in volume, even resulting in sudden random volume drops or fade-outs when playing. Weakening tubes will also affect the frequencies that your amps can produce. It’ll widely degrade the tone, which gets interpreted as volume loss.
A common example can be your amp losing the low frequencies. This results in a loss in the bottom end, resulting in a thin, tinny sound. If your amp hasn’t had a tube change, then the first protocol needs to be to replace the bad tubes.
Usually, power tubes will be the first to go, as they have a lot more fragile components. These will run at higher voltages and are responsible for the bigger job of amplifying the speaker’s signal. Preamp tubes, on the other hand, will be more reliable. They’re compact and tasked with amplifying the guitar signal to the amp using less voltage. This means that they wear out less frequently compared to power tubes.
How to know if the tubes are overheating?
The fact is that amp tubes normally generate a lot more heat, meaning that they’re working fine. It’ll be difficult to tell when tubes are genuinely heating, as all amp and tube combinations are different. Moreover, they run optimally at various perimeters. Most amp tubes optimally run at a range of 150°-250°, giving you a fair amount of variance to work with. Some guitarists worry about the heat generated from the tubes, pointing at a fan at the back of their open-back amp for cooling them down. However, it isn’t recommended, and neither is installing an internal fan. Blowing cool air on your tubes will mean that they’ll need to work harder to maintain the operating temperature.
Secondly, do you know why it’s said that you shouldn’t pour boiling water on a frozen car window on a winter morning? This is because you’ll end up cracking the glass. This is referred to as “thermal shock” and for the tubes, the same principle will apply, but in reverse. If you try to cool extremely hot tubes quickly, it can strain the glass. Moreover, it’ll weaken them, which will likely cause a leak in the sealed vacuum and result in a leaky death.
The reality is that the amp is normally designed to withstand heat in most situations. For instance, rehearsing and performing on a humid stage, playing in the bedroom, and more. With that said, it is recommended that you should get a fan for the amp facing at a 45° angle. It shouldn’t be directly in front of the tubes.
The primary reason why amp tubes get a bit too hot is that they either have too much power or too much voltage running through them. Sometimes, it could even be a combination of both. Remember that the heat coming out of the amp can be from other components too, not just the tubes. However, if it feels hotter than usual, take it to a local technician.
When to replace power and preamp tubes in a guitar amp?
This is often a hotly debated topic in the tube amp community. However, there isn’t a concrete answer, as tubes don’t come with a specific lifespan before they die down. Some tube amp users replace them every couple of years. Meanwhile, others replace their current tubes only after they have died out.
The main reason why you’d want to replace your tubes is with respect to the tone. When you first purchased an amp, you’d have been thrilled with the tone. But over time and after excessive usage, the sound starts degrading and isn’t as sharp and crisp as before.
This change might have been so slow and gradual that you might not have noticed with your ears adapting to the tonal changes. A fresh power tube replacement will give your amp a new lease of life, upgrading the tone to how it was when you first purchased it.
So ultimately, there is no set time when you must replace guitar amp tubes. However, you’ll need to carefully examine your amp from time to time and know about the tubes.
How to test guitar amp tubes
Here are multiple ways how to test tubes in a guitar amp that you should know about.
Visually inspect the tubes
- Inspect the colored coating of the tube – The coating or getter will be on the top part of the guitar tube. Normally, it’ll be gray, silver, or black. A white coating will mean that the tube has a crack. This means that it’s time to replace it with a new guitar tube.
- Plug the guitar tube into an electrical device to check its glow – Put the guitar tube into your tester guitar amp, or any other tube-using machine. Turn on the machine for activating the tubes and then look for a red, orange, or purple glow. If the heated filament inside the tube is glowing orange like a setting sun, it’s a sign that the tube is healthy.
- The filament might be hard to use. If you aren’t seeing the glow, it doesn’t necessarily mean that the tube is bad. You should remember that some tubes glow much more than others.
- If the tube isn’t glowing at all, you should try to touch it. But be careful as the guitar tubes get hot when they are active. A cold tube will be one that doesn’t work anymore.
- If the device isn’t turning on at all, it could be an issue with the device’s fuse. You should replace the fuse or get an expert to look at it.
- Look for a purple glow around the internal wire – The wires present inside the tube are easily visible behind the glass. When they’re electrified, they could give off a purple glow. Purple concentrated around the wires is usually an indication that the tube is defective. You might even have noticed a blue glow concentrating around the glass, which is the norm.
- Replace the tubes if they glow red – Sometimes, the plating inside the tubes might turn red. It’s a sign that the tube isn’t properly installed in your electrical device. If the tube stays red, it cannot control the electric current. This could eventually damage your device.
Test the sound of the tubes
- Shake the tubes for any signs of rattling – You should be gentle to avoid potentially damaging the component. A bit of rattling should be expected. If it sounds too loud or you’re noticing a loose piece moving inside the tube, the tube is probably broken. It’ll then have to be replaced.
- Tap the tubes with a pen or pencil and listen to their ringing – Plug the tube into the amp or any other machine. Bring a chopstick or pencil or another wooden implement. Use it for gently tapping each tube. All the tubes ring, but the bad ones sound louder and might even cause the device to squeal.
- Swap the tubes to ensure you’ve found the faulty one – Turn off the amp and swap the tubes. Turn the knobs on the amp or other devices for activating each tube. Tap the tubes once more as you go and listen for the ringing sound. A bad tube would be loud regardless of the channel it’s on. Swapping the old tube with a new one would be a good test. If the old tube seems to be broken, the new one wouldn’t ring as much.
- Hold the tube while using the device to test it – Wear an oven mitt or protective gloves on your hand. Hold on to the suspect tube as you’re using your amp by playing a note on the guitar hooked to the vacuum tube amp. You’ll notice that it’ll have less rattling if the tube is broken.
Using a tube tester
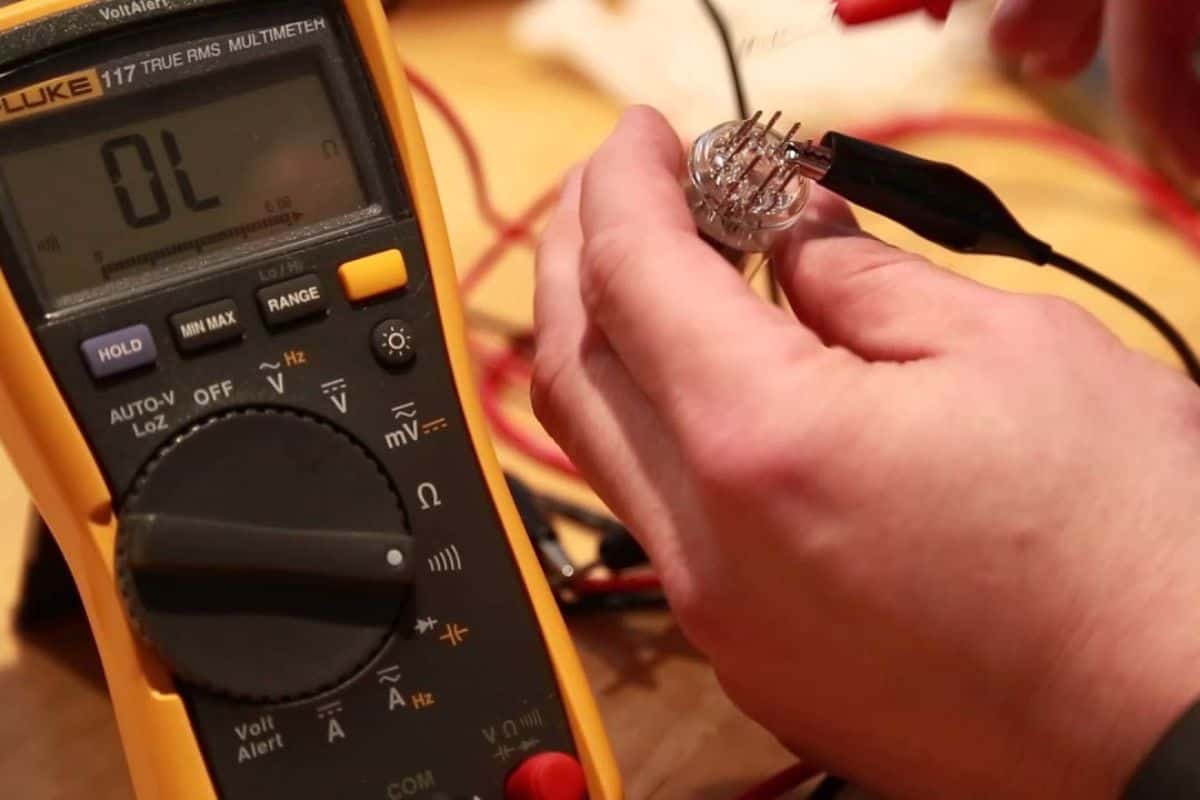
- Buy a tube tester – You can find tube testers by looking them up online. Check auction sites or online tube stores to find a wide variety of testers. Choose one that suits your budget the best. The used ones normally start at around $35 USD. As the technology isn’t commonly used these days, expect high-quality store-bought tube testers to cost a couple of hundred dollars. Emission testers will only show whether the tube is working. Mutual conductance testers will show how well the tube is working.
- Look at the print on the tube to identify it – A series of letters and numbers will be printed on the side of every guitar tube. This code is what you’ll be using to figure out where to place the guitar tube in the tester. For instance, the letters and numbers on the tube could read something like “12AX7”.
- Insert the guitar tube into the tester’s socket – For finding out which socket the tube will go in, use the chart that comes with the tester. Look up the letter and number code in the chart and select the correct socket. In case you don’t have a chart, try to search for it online.
- Look for any visible signs of damage on the guitar tube – Before you turn on the electricity, give the tube a quick inspection. Notice any evidence of bent pins or broken glass inside the tube. Discoloration or loose parts are signs that the tube has to be replaced. If you’re seeing that the tube is broken, you shouldn’t test it. It might damage the tester.
- Turn on the tester according to the chart – Using the code on the vacuum tube, check the testing chart again. Set the tester’s switches as per the instructions on the chart. This will turn on the electrical connection, which causes the tube to function.
- Check the test results for seeing if the tube works – The testing results will depend on what type of tester you are using. First, you should check for a red and green gauge with a needle. In case the needle moves into the green zone, it means that the tube still works. If the tester does not have this gauge, it will give a number that you should look up in the chart.
Conclusion
Thank you for reading. Hopefully, now you know a lot more about how to test guitar amp tubes, how to tell if an amp tube is bad, how to diagnose the guitar amp tubes, and more. It is essential to test your guitar amp tubes as they can greatly affect the sound of the amp. You will have to find out the cause of the problem and try to fix it. There are multiple ways you can test the guitar amp tubes and resolve the issues, such as visually inspecting, checking the sound, and using a tube tester.
Image Credit:
Images: Tech Week Mag

