
So, you have mastered tuning your guitar with your handy electric tuner. A great next step in your journey of mastering your new instrument is tuning your guitar by ear. This can be an intimidating new skill to acquire. A proficient guitarist should not be beholden to their electric tuner. This article will walk you through the tuning process and answer the question of how to tune a guitar by ear. With plenty of practice and dedication, you will be tuning by ear in no time.
Standard Tuning
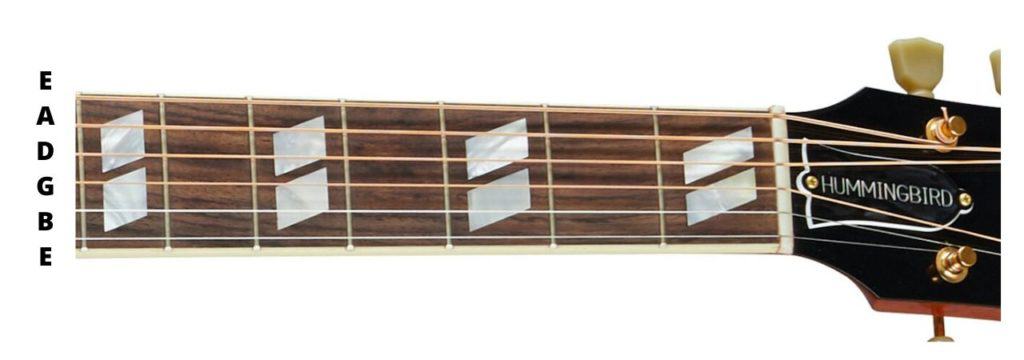
The standard tuning for guitars is called just that, Standard Tuning. As discussed in the article “How To Tune A Guitar With A Tuner“, this tuning system allows for easier chord fingering and movement through major/minor scales. The ease of these scales and chord production makes this the most ideal set-up for the guitar strings, thus why this tuning has been standardized. The thickest and topmost string is tuned to low E. Moving down from top to bottom, and thickest string to thinnest, the note line-up is E, A, D, G, B, E.
With this tuning, we find that each string has a specific musical interval between each string. While this information is not as important in tuning using an electric tuner, it becomes very important when tuning a guitar by ear. A combination of perfect fourths and one major third is used. Historically, this is derived from the guitar’s ancestor, the viola da gamba.
If you are unsure of what these intervals sound like, don’t worry. There is a simple way to find each of these intervals. The first two notes in “Here Comes the Bride” outline a perfect fourth. Hum the first few notes, and you’ve found a perfect fourth. All the strings are separated by this interval except the G and B strings. This interval is a major third. A great song for song association, in this case, is “When the Saints Go Marching In.” The first two notes outline a major third.
How to Tune a Guitar By Ear?
First, you want to determine what you will tune your guitar to. Are you playing alone, with a partner, or a group of musicians? You can easily tune your guitar to itself. Or, if you are playing with a group, you will want to base your tuning off of a single member. In this way, all pf your instruments will be tuned together and will not sound off.

If you tune your guitar to itself, you may proceed without an outside source. Although it is recommended to seek an external source. This way, you can guarantee the intonation of your guitar. Using a synthetic tone produced from an app/computer, piano, or a pitch pipe is a great method of finding a pitch. Traditionally, classical instruments are tuned to an A. This pitch is referred to as A440 because it resonates at 440 Hertz. For guitar tuning purposes, you will start with your lowest string, the low E. The best way to describe tuning by ear is pitch matching. You will make your way down the strings, starting from the low E moving to the high E, by matching the next string to the one that precedes it.
Start with your lowest string, the low E. You will either find an E by playing an outside source or simply say the string is close enough and tune your guitar to itself. Once you have your E, find the fifth fret and hold the E string down in this fret. The tone that will sound here is an A. As you will recall from earlier, the next string name is A. Pluck your A sting without depressing any frets. The two strings should be sounding the same pitch.
You must now adjust the machine head, also called a tuning key, so that the two tones match exactly. If you are having trouble determining this match, listen carefully for a “wobble.” This out of tune wobble is created by the two strings vibrating at different speeds. As the strings are tightened, and the speed of vibration becomes closer together, this wobble will disappear, and a clear tone will sound.
You can continue in this same method moving down the line of strings. Press the fifth fret on each string and match the pitch of the next open string to its predecessor. You will use this method for all strings except the B string. When its time to tune the B string, you will press the previous string, the G, on its fourth fret. If you remember from earlier, the interval between these two strings is different than the others. We must adjust accordingly. By pressing the G string in the fourth fret, a B will sound, and you will move forward in your tuning. For the last string, high E, you will return to using the fifth fret, as you did before.
You will always want to tune-up to pitches. By tuning-up, the strings are being tightened. This keeps them nice and taut to allow for clear playing. If a string is too sharp, or too high, the best method is to loosen the string significantly and then tune it up from this looser position.
It is always a good idea to double-check your tuning. Mistakes can happen, adjusting the wrong machine head is a common mistake. Go through the same tuning method a second time. It should go much quicker the second time through, and you will ensure a perfectly tuned guitar. It is also important to tune your guitar at least once, maybe more, before every practice session or performance. Strings can fall out of tune for a variety of reasons. Weather, humidity, and age all affect a guitar’s tuning.
Practice makes perfect. So from now on, tune your guitar by ear first. If you don’t get your tuning right by ear, don’t be afraid to turn to your trusty electric tuner to check yourself. Trust your ears, and have fun!

