Have you been having trouble connecting the looper pedal to your guitar setup? If so, then this article is just what you need. By the time you’re done reading this article, all your issues will be resolved.
Connecting a looper pedal is actually an easy task as long as you know the right steps. You’ll need to make a connection with the amp, then stomp on the footswitch to start recording.
In this article, you’ll get to know all about looping, looper pedals, how to connect a looper pedal, how to connect a looper pedal to an amp, how to use a looper pedal without an amp, and much more. Stick around to know all the answers that you’re looking for!
What do you mean by looping?
Live looping has become a popular technique that has taken the art of performance to an entirely new level. Any guitarist or musician, whether a beginner or a seasoned veteran, can add their own flavor to their part. This can be done by using a high-quality looping effect on the track. Looping can also inspire a completely new track when used in the studio. However, before doing that, it is important to know what is looping and how it’s done.
Looping is the technique that’ll allow you to record a section of what you’re playing and form a repetitive loop. This loop or phrase can be recorded in real-time and played back. What you do next with this loop will be up to you. You can use this as a backing track, as a soundscape, as rhythmic percussive, or more, the possibilities are endless. However, the fun doesn’t stop there. The best bit about looping comes from overdubbing.
Overdubbing is the process of recording music over previously recorded sections. It’ll be similar to the way you’d overdub vocals when you’re recording a song. Adding overdubbing will give depth to the phrase while also taking the looping to the next level. You can also overdub a bass line over the drum loop, and you’ll be ready for your solo. You can also stack multiple overdubs together by playing or singing different harmonies for a rich, dense track.
Looper pedals to elevate your studio and live performances
A looper pedal is essentially a stompbox. You can easily use it for recording and playing back your recorded snippets on the fly. You have to plug the guitar into the looper pedal and connect the pedal to the amp. You’ll stomp the looper pedal’s footswitch and start the recording, play/record something, stomp on the looper to stop the recording, and start the playback. This recorded segment is called a loop.
Looper pedals are a great addition for any guitarist to have at their disposal. You can easily use them and get more out of your practice sessions or live performances. You can even learn a lot about music composition and harmony by using looper pedals. On top of all that, looping is an extremely fun thing to do.
- You can use the looper pedal for recording yourself playing the chord changes to your guitar solo. Then, you can practice this solo over the looped chord changes.
- You can even use the looper pedal for recording yourself playing the rhythm part. Then, practice playing additional rhythm guitar parts alongside the loop.
- You can use the looper pedal for recording yourself playing the melody. Then, practice playing the harmony part alongside the looped melody.
- You can use the looper pedal for creating a full piece of instrumentation that includes harmonies, lead lines, bass lines, and rhythm guitar parts.
While there are many useful ways of using looper pedals, a few guitarists struggle to use this device effectively. The struggle can either include not knowing what to play to not being able to properly time the starting and end of the loop.
There are many different models and brands of guitar looper pedals in the market. Some of them are built into other guitar pedals. It doesn’t matter which option you go for, you will always find something for yourself. There are so many options, you can easily choose an inexpensive unit with simple controls if you want to get started with looping. The easiest and most straightforward pedals will come with a footswitch.
By using single or double taps on the footswitch, you’ll be able to control starting, stopping, and overdubbing the loops. Units that have two or more footswitches will allow you to easily control the looper functions independently by tapping on different footswitches. This will make looping much easier as you won’t have to do any double-tapping of the footswitches. Double-tapping could be awkward in the middle of your performance.
How to perfect the skill of starting and stopping the looper pedal?
The most important thing that you must know about using a looper pedal is how you’re starting and stopping the loops on time. You’ll want the loops to repeat seamlessly such that you have a steady, continuous piece of accompaniment that plays over. You can create a seamless loop by simply stopping the recording at the precise point in the music where you started.
For instance, say that you want to record and playback music using an A minor chord. You can easily record yourself playing four quarter-note strums on the Am chord to complete a measure of music. You should strum the Am chord for a few seconds to determine the tempo, while ensuring your timing is correct. While you continue strumming quarter notes on the Am chord, stomp on the looper pedal on beat 1 to start recording. You must stomp on the looper pedal at the same time as you’re strumming down across the guitar strings on beat 1. You must maintain steady strumming when you’re recording as if you’re playing with a metronome.
When you return to beat 1 again, stomp on the looper pedal for stopping the recording and finishing the loop. Moreover, you must stomp on the looper pedal and strum down across your guitar strings at precisely the same time.
Most looper pedals will immediately start playback once you stop the recording. The recorded segment will be played back in a continuous loop. The loop will continue until you’ve stopped it, usually with a double-tap on the footswitch You can even use a dedicated stop footswitch if the looper pedal features one. While the loop is being played, your hands will be free to play something else. As you’ve recorded yourself strumming the chords, you should also practice playing minor scale patterns over the loop.
How to connect a looper pedal and use it with an amp?
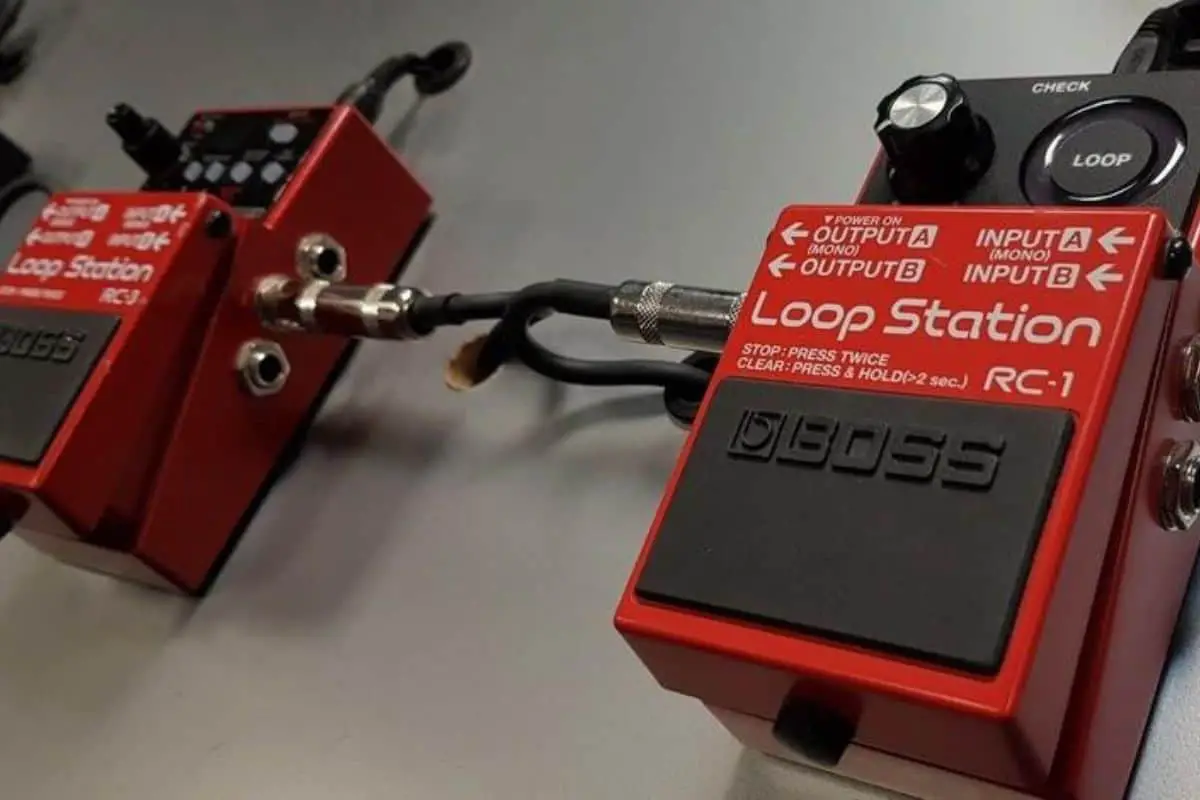
Before you start using the looper pedal, you’ll need to connect the loop station. You’ll need to insert the cable from the instrument (guitar) into the INPUT of the loop station. The OUTPUT will then go to the amp. You should ensure that you’re supplying power to the pedal, and you’ll be ready to loop. Looping the first phrase or section will be super easy.
1. Record
The first step would be to think of what you’re going to loop. You should start with a four-count bar of a G major chord. You should strum a rhythm and then count – 1, 2, 3, 4… 1, 2, 3, 4. Now, you’ll have to start recording on bar two after pressing once to create a start point of the phrase. Then, you should do it once more for the endpoint.
The recording would be marked once the red REC LED lights up. Then, you should strum the same rhythm again for bar one and then count 1, 2, 3, and 4. Once you get to the “1” of bar two, you should step on to the Loop Station. Then, count 2, 3, 4, and then onto the next “1”. Then, you should step once more on the pedal and stop playing the guitar.
You’ll hear a phrase of the G major chord, which will loop over and over. Congrats, you’ve just made your first loop. The loop will now start playing in an overdub mode.
2. Overdub or playback
Once you’ve made your first loop, the first press of the footswitch will make the starting point of the phrase. For marking the endpoint, you’ll have two options. You can either keep recording or you can hear the phrase played back.
Overdub mode
Then, you should continue recording. Overdub mode will be engaged by pressing the footswitch once for marking the endpoint. It’ll be indicated by both red and green LED lights being lit. This mode will continue recording, so anything that you play “over the top” of the phrase will be recorded. You must give it a try for a better understanding.
Make a loop and then engage the overdub mode. You should begin playing another version of the G major chord and stop playing while letting the Loop Station play. You’ll now be able to hear both parts playing on top of each other. If you’ve finished overdubbing, you should press the footswitch once more. You’ll now reach the playback mode, which will be indicated by the green LED light getting lit.
Playback mode
You’ll be able to switch between the overdub and playback mode with a single press of the footswitch. You should know that you cannot record in playback mode, but only play over the top. This will be perfect for practicing solos over the looped chords. You’ll be able to see if you’re in playback mode if only the green “Play” LED is on. You can easily go from the record mode to playback mode by slowly hitting the footswitch twice.
3. Stop
Once you’re satisfied with the loop, you’ll want to stop it. This can be done easily by pressing the footswitch of the loop station twice in quick succession. You can do it at any time in the looping process for stopping the phrase from playing back.
Well done, now you know how to use a looper pedal to create loops. However, this is just scratching the surface. As you start using more advanced looper pedals, you’ll come across more looping functions like Undo, Redo, Reverse, Auto-Start, One-Shot, Rhythm Tracks, and more.
Is it possible to use a looper pedal without an amp?
In theory, yes, it is possible to use looper pedals without an amp. Many high-end looper pedals come with dedicated headphone outputs for this purpose alone. However, plugging your headphones into a normal output isn’t actually recommended. If the looper pedal does not have a headphone output, using a headphone amp will be a decent solution.
Even though the best option would be to use an amplifier, this isn’t something that is always possible. Thankfully, many loopers will allow you to easily connect to the headphone output. It may be tempting, even if the looper doesn’t cater to headphones, to plug a pair into the output.
This isn’t actually advised, as the power of a normal output will be different from a headphone. But if you’re still set on knowing how to connect a looper pedal without an amp, then it is possible to achieve that. The easiest way of using a looper pedal without an amp would be by using a dedicated headphone output.
If the looper pedal accommodates that, it’ll most likely come in the form of a 6.35 mm jack output. It’ll be important to remember the fact that the headphone jack outputs will be different from the standard output that you’d send from a looper into the amp.
Large, high-end expensive loopers come with a headphone output. If this is the case, you can use the looper pedal without an amp. Simply plug the headphones into the output and the audio will get sent to the headphones. The obvious downside to this method would be that you’ll be hearing clean sounds from the guitar or other instruments. Rather than the tone getting amplified, it’ll be completely clean, and it’ll be reflected in the overall sound.
In case the looper doesn’t have an output for the headphones specifically, it’ll be tempting to connect them to standard output. This won’t be a good idea as different output types come with varying Ohm ratings. Consequently, the drivers will be either underpowered or overpowered, which could damage the headphones. To know whether or not your guitar looper pedal has a headphone out, you must examine the input/output section.
An alternate way to connect a looper pedal without an amp
There is an alternate way of connecting a looper pedal even if you don’t have an amp –an audio interface. This method will consist of using an audio interface instead of an amp. This will send the output from the looper straight into the direct input on the device. Audio interfaces will be a great alternative to using an amp with a looper as they come with two options – recording from the output or real-time playing.
In case you turn on direct monitoring, which is a common feature that most interfaces offer, you’ll be able to do both of them simultaneously and record your rehearsals effectively. This will be a great way of practicing playing the guitar more effectively. By listening to the output coming from the looper as you’re playing, you’ll get the benefits of the rehearsal. Audio interfaces can be easily sent to either headphones or monitors.
Ultimately, regardless of what equipment you have at your disposal, you’ll be able to use looper pedals without an amp. Not to mention, audio interfaces are vital parts of equipment for any guitarist or musician. Whether you’re using an interface for connecting a looper pedal or not, it’ll be a worthy investment if you want to record and create your original material.
Conclusion
Thank you for reading. Hopefully, now you know a lot more about looping, looper pedals, how to connect a looper pedal, how to connect a looper pedal to an amp, how to use a looper pedal without an amp, and much more. You’ll need to connect a looper pedal to an amp and create loops that take your sessions and performances to a whole new level. However, even if you do not have an amp, you can still reap the benefits of looper pedals by using headphone output or audio interfaces.
Image Credit:
Featured Image: Gig Gear
Images: Sweetwater

