Have you been working hard setting up your pedalboard but don’t know how to mount the power supply? If so, then you’re not alone. This is a common mistake, especially for newbies.
Mounting a power supply under pedalboard will involve selecting the right power supply, drilling holes, installing the power outlet, and finishing things up. It’ll be a seamless process as long as you know the right steps.
In this article, you’ll get to know all about how to mount power supply under pedalboard, why do you need power supply, what type of power supply to choose, and where to put power supply on pedalboard among others. Continue reading to know all the answers.
Why does your pedalboard require a power supply?
Batteries are something that musicians often have a love/hate relationship with, especially when used for powering the pedals. This becomes even more significant when the pedals are mounted on a pedalboard. Dealing with a dead or dying battery will be a major project in itself. If you’re running over 2-3 pedals, you would probably start thinking of assembling your own pedalboard. But why do you need a power supply for your pedalboard?
Guitarists absolutely love pedals. However, it doesn’t take long to get tired of juggling them around to set them up separately. You have no other option than to think of turning to a pedalboard.
Once the pedals are mounted on the pedalboard, changing the batteries could become a huge pain. Add to it the fact that most modern pedals don’t actually use batteries. This is either due to small form factors or the Digital Signal Processing (DSP) chips in pedals with higher current than what batteries would normally provide to get the job done. This is the time guitarists turn to the help of a power supply that can easily handle the pedal effects. With the wide variety of pedalboard power supplies available, a little background check is necessary.
Volts vs. Amps – What is the difference?
Every power source that you’ll come across is generally rated for two things – volts and amps. What are these things and how are they different?
You should start off with one of the most popular analogies in general science – a water faucet. If you’re thinking of the source of electricity as a water faucet that is feeding a hose, the voltage will be analogous to the water pressure of the system. It’ll be the amount of potential energy that the system can supply.
Traditionally, pedals come with pesky rectangular 9V cells, with a fair number of pedals needing 18V or 12V. Meanwhile, some new ones require a 5V power supply via a USB port. Amperage or current is thought of as the volume of water that is flowing past a certain point. A higher amp rating will mean a larger pipe that allows a greater volume of water to flow at a constant pressure.
Now, coming back to the electricity, most pedals require 9V at 300mA (milliamps). They will not work with power supplies that are rated at 100mA or less. This is the case because they don’t supply enough current flow for the components in the pedal. Modern DSP-based pedals will need an available current of 250mA and higher, which can quickly drain a regular battery.
What are the basic types of power supply for pedalboards?
There are multiple basic types of power supplies with the second class featuring two subdivisions. The first one is a daisy-chained power supply, while the second one is isolated power outputs.
Daisy-changed power supply
The first and most basic type is the daisy-chained power supply. These supplies are the more affordable option and supply a single voltage with chained connectors. It’s a simple and solid way of powering the pedalboard as long as the total current demand of the pedals is less than the available current rating in the power supply.
Although many guitarists don’t have any issues with daisy-chained power supplies, they’re vulnerable to fostering ground loops. This happens as the pedals already share a common ground through the pedal’s sleeve connectors and the instrument cables.
As any noise or interference will have two potential paths to the ground, any noise from the loop will get picked. It’ll then get passed to all the pedals, which might re-amplify the noise. There are even pedals that simply won’t work with a daisy-chained power supply. Normally, this is noted in the manuals, but some vintage pedals, such as germanium fuzzes, cannot deal with being chained to center-negative powered pedals. In case you have a couple of decent pedals, a daisy-chained power supply will be a great option. It’ll actually be the easiest, quickest, and most affordable way of powering the pedalboard.
Isolated power outputs
The second class of power supply will be the ones that offer isolated power outlets. This will mean that each transformer-isolated output will have its own ground and even voltage. This essentially removes the possibility of ground loops and associated noise. It’ll also allow you to have outputs dedicated to devices with higher current needs. It can even have outputs with a switchable voltage having 9V to 12V and adjustable voltages.
Within the classes of isolated power supplies, there will be two types – switched-mode and linear regulated mode.
Linear power regulation is essentially a traditional analog design. It’ll act like a variable resistor, which ensures that only the needed power gets allowed through. This will make for low-noise, ripple-free power, but it’ll come at the cost of being inefficient. Any voltage that is above what’s needed will get burned off as heat. This is why linearly regulated supplies are larger and heavier because of the need for large heat sinks for dissipating excess thermal energy. This means that you may end up using twice as much power as you’ll need to get the job done. Linear mode supplies aren’t very graceful when it comes to handling multiple AC power sources.
Generally, they’ll be either 120V 60Hz AC or 220V 50Hz AC only. The ones that switch between source voltages would be a bit larger due to the need for a different kind of transformer. They even need to be manually configured to give different main voltage levels. Forgetting to switch when needed could result in informal pyrotechnic effects, the type that you distinctly don’t want.
Which mode is more effective?
Switched-mode power supplies are generally more efficient than linear regulation power supplies. In simple words, they’ll use a semiconductor for rapidly switching between on and off modes. Then they’ll make use of inductors and capacitors for smoothening out the ripples in the power. They’re capable of generating minimal heat and will be smaller and lighter compared to linear-regulated supplies. Meanwhile, they also have the ability to supply higher current levels. In fact, most wall-wart power supplies that you come across today are switched-mode.
The biggest potential downside of switched-mode supplies is that they have a higher noise floor. This results in a less dynamic range compared to linear mode, while requiring more filtering. But this is only a possibility. It is important to remember that whether a power supply is switch mode or linear regulated isn’t necessarily obvious. The rule of thumb is that they can handle 120/220 without needing to flip a switch on the power supply.
How to mount power supply under pedalboard
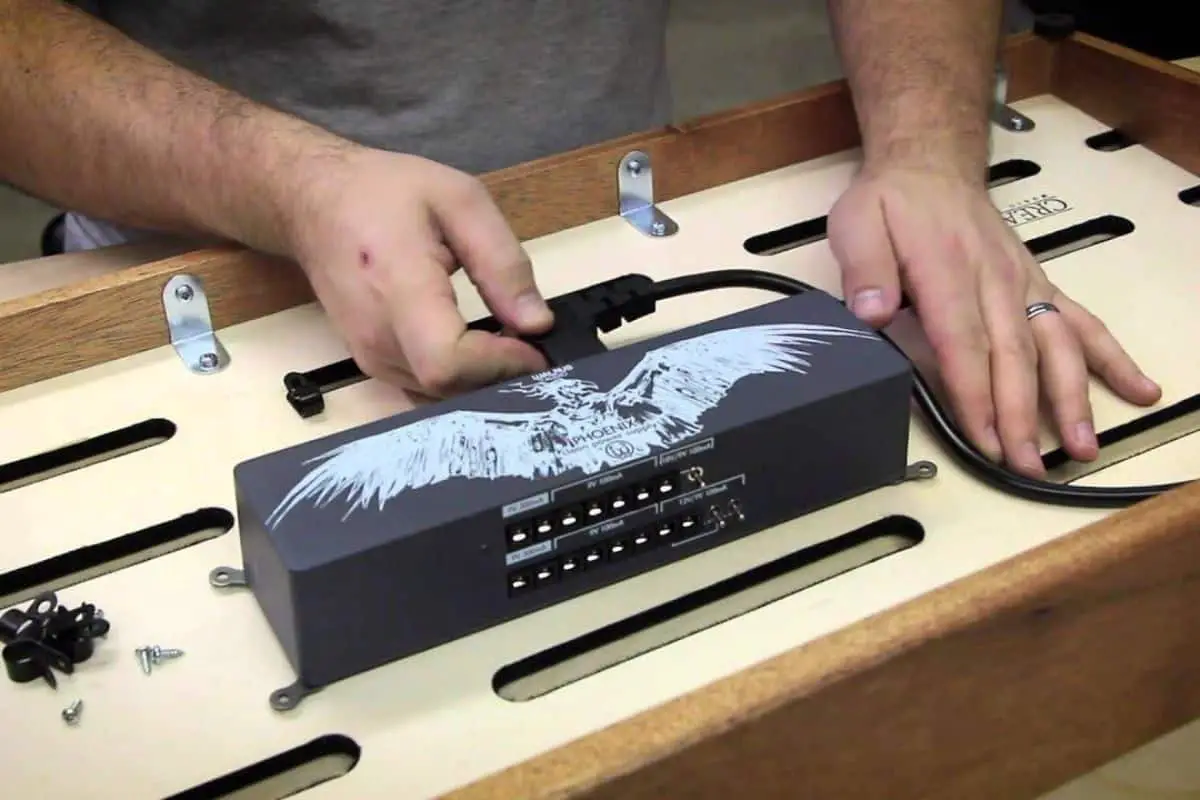
When installing the power supply, you’ll need to know more than just how to mount the power supply under pedalboard. There are certain pedalboard + power supplies that don’t require additional parts or drilling. For attaching the power supply to the pedalboard, you can either use pedalboard brackets or black 3M Dual Lock tape. The brackets will come with the power supply, alongside the power supply’s own screws. The brackets will also have the correct screws for assisting in where to put the power supply on pedalboard.
The installation will be done underneath the pedalboard frame. However, you can also mount it on top of the board using 3M Dual Lock tape if you know how to mount power supply to pedalboard. You can pad out the space between the brackets and the power supply chassis with the tape. This will result in a tighter, snugger fit while filling the empty gaps. You can use the brackets for installing anything under the board. It’ll be possible as long as the equipment’s height is fitting properly. Moreover, it’ll be easy to bend brackets by hand, which you have mounted under the pedalboard.
How to mount power supply to pedalboard?
Once you have managed to choose the right power supply for the pedalboard and once you’ve chosen the mounting brackets, you can begin installing the power supply. Here is a simple step-by-step guide on how to mount power supply to pedalboard.
- Clean the pedalboard frame thoroughly using a cleaning spray and a clean rag. The surface needs to be free from any dust and grease. You should be even more thorough in case you have previously gigged the board. If there is a lot of grime and residue from old adhesives, you should take extra cleaning measures.
- Then, place the frame face down on the ground or the table.
- You should place the power supply in a way that it’ll be far away from any pedal susceptible to the induced hum. You can use the notes from the pedal testing at the start to check.
- Place the power supply in the brackets inside the frame. In some cases, you’ll need to plug in the connector for ensuring it fits inside the frame.
- Mark the needed holes with a sharp tool or a felt pen. It’s recommended that you should make small dimples in the middle of each mark. This will keep the drilling bit from sliding across the frame’s surface.
- You’ll then have to remove the power supply assembly from the frame and then keep it aside.
- Drill 3 mm diameter holes into the frame. Some pedalboard frames might need 4.5 mm diameter holes. Pedalboard frames made from aluminum will be easier to drill holes into, even with a weak, cordless hand drill.
- Then, you’ll have to put the power supply assembly back into place above the holes.
- Use the screws that are supplied with the brackets for installing the assembly with a cordless drill or a screwdriver.
- You’ll then have to mark the power supply outputs on a long strip of masking tape. This will depend on the place you’ve made at the start. Make use of the effect pedal names and note the section where there will be a splitter cable. While these aren’t the final markings, they’ll be good enough to keep you informed about the situation.
- Plug in the power supply cables that you’ll be needing with the pedals.
In case a pedal isn’t equipped with standard power connectors, you can always use the Battery snap cable for connecting the power supply. Depending on the pedal’s collectability and the type of housing, you can use a small file for making a small channel in the casing. This will prevent the power cable from getting pinched between the base plate and the casing. If necessary, you can mark the power supply cables with masking tape. This makes connecting the right plug to the right effect far easier.
The power supply cable could be left dangling loose under the frame for the time being. This way, finding the right output will be quite easy. If you have any doubts about the cable, you should always double-check.
For pedals that have exotic power requirements and/or non-standard connectors, you should install a power strip of outlets to the underside of the pedalboard. This makes it possible to use the original power supplies with the effect pedals. The sockets will power the pedalboard’s PSU, and they’ll be fed by the AC-power cable in the cable room without requiring additional cables.
Why mount an isolated power supply for your pedalboard?
One of the most important decisions that you’ll be making when buying the pedalboard power supply is whether you’ll be needing isolated outputs or not. Essentially, isolated outputs will supply each individual pedal with its own power source. This will remove the hum from the equation, something that you’d experience when running analog and digital pedals from the same daisy chain. Unless you’re running a few analog units, which is unlikely, it’s recommended that you should go for an isolated power supply.
If you’re tired of unwanted noise in the signal chain, then you’ll probably be thinking of upgrading the power supply. More often than not, the buzz or hum will be caused by power-line noise. Of course, some of it will come from the amplifier. However, you don’t need to live with the noise from the pedals, as most of it can be removed.
Individual pedals, especially digital delays and distortions, are likely to feature some kind of power-line filtering. However, without an isolated power supply, that’s one where each output will power a pedal only and the power lines aren’t crossing. It’ll be possible to pick up noise from other pedals that are sharing the same power source.
Another key benefit of isolated outputs will be in knowing that the current delivered to the pedal is consistent. This is especially important with digital pedals. The isolated power units send a specific amount of current to the outputs, ensuring that the pedals are receiving exactly what they need. In comparison, daisy-chain, parallel, or non-isolated supplies will divide the current that is produced between the outputs. This will mean that the current between the pedals can be variable.
What power supply will you require for your pedalboard?
You’ll need to assess the power requirements of the pedals you’re adding to the pedalboard. Do they all require 9V or are some of them running on 12V, 15V, or 18V? You should also remember that some overdrive pedals will be capable of running at higher voltages to give increased headroom. Many power supply options offer switchable voltages, while some can sag below 9V to give dying battery sounds from fuzz pedals. There are also mA requirements as certain fuzz and overdrive pedals can only draw 10mA. Meanwhile, multi-effects and contemporary digital effects can draw between 100mA and 1,000mA. In such instances, you should look at power supplies that can output higher mA from each output.
Conclusion
Thank you for reading. Hopefully, now you know a lot more about how to mount power supply to pedalboard, why do you need power supply, what type of power supply to choose, where to put power supply on pedalboard, and more. It’s essential to mount the power supply under the pedalboard to give proper functioning and a neat look. For properly mounting the power supply under the pedalboard, you’ll need to have a clear, well-designed plan. This article would have given you the plan and hopefully made the process as seamless as possible.
Image Credit:
Featured Image: Creation Music Company
Images: Reddit

