
Do you often struggle with attaching the pedal to the pedalboard because you don’t know which side to use? If so, then all your worries will be resolved here.
The Velcro side that goes first is something that does not matter. It’s your pedalboard, you get to decide in pedalboard Velcro which side goes first. It’s all well and good as long as the pedals aren’t falling off the board.
In this article, you’ll get to know about pedalboards, in pedalboard Velcro which side goes first, which side of Velcro on pedalboard will give better results, and a lot more. Stick around to find out all the answers.
How do you transport your pedalboard generally?
One of the biggest issues with pedalboards, especially self-assembled ones, is that pedals come off during transportation. The pedals aren’t secure enough, and they end up becoming loose when you’re carrying the pedalboard. This can put dents and small faults, while also putting excess strain on the pedal’s connectors.
In the worst-case scenarios, it can even break the pedals. However, carefully attaching the pedals will increase the lifespan of both the pedals and the pedalboard.
Moreover, it’ll also save you the trouble and cost of having to get them repaired.
You’ll need to think about how often you’re detaching pedals from the pedalboard and the significance of a lasting attachment. If you’re primarily using your car and the regular venues are just the living room and your rehearsal space, you’ll be fine with a less sturdy type of attachment. Tour buses and air travel, on the other hand, put far more strain on the equipment.
On the other half, nothing will save you from the wrath of customs inspection. At least this way, you’ll know that you tried your best when attaching the pedals.
Attaching pedals to the pedalboard is essentially a balancing act between keeping everything securely attached and the ease of detachment. The best way of attaching pedals to the pedalboard would be by using Velcro. You can use punched metal strips, cable tips, zip ties, or something similar for attaching the pedals too. However, it isn’t recommended. You need to be able to remove the pedals without needing to resort to tools.
Velcro – A cheap and easy way of attaching pedals
Velcro is the simplest and most affordable way of attaching pedals to a pedalboard. This is why most pedalboard frame companies prefer to include a roll of Velcro with their products. Velcro works in situations where you’ll want to swap around pedals frequently and when it isn’t being used for touring.
The potential drawbacks of Velcro are the tendency for the pedals to wobble if you step on them. Some pedals might even come off under certain circumstances. Different types of Velcro will have different adhesives and strengths.
Unlike 3M Dual Lock, the word Velcro tends to have a generic synonym for any kind of hook and loop fastener, regardless of the manufacturer and quality. Old products are often sold as Velcro these days, that’s why you cannot always be sure of what you’re getting.
Velcro can be a great solution in many cases, but it’ll be less sturdy and needs flat surfaces to work. For instance, Velcro isn’t thick enough for working with most pedals even if you’ve removed the rubber feet. Large and heavy pedals can be difficult to keep in place. The same applies to mini-pedals with the surface area being too small to keep them in place using the Velcro.
If you’re making your first pedalboard and you aren’t planning on moving it too much, you can definitely use Velcro. Once you start traveling regularly, you might want to think of a more permanent solution.
Pedalboard Velcro which side goes on the pedalboard?
If you’ve just bought a new pedalboard or created a pedalboard yourself, you’ll need to set it up properly. Setting it up will have its own set of challenges and issues. You’ll need to have all the effect pedals properly ordered. Then, you’ll have to ensure that all the wires are properly routed. Once you’ve got it all figured out and it’s time to commit, you’ll have the important question – which side of the Velcro goes on the pedalboard?
This is a fairly common question that most guitarists and musicians and anyone setting a pedalboard seem to have. Most people form their own opinion and there are a lot of discussions over which side goes first.
Ultimately, it doesn’t really matter which side of the Velcro goes first. It’s your pedalboard, you can do what you want to do with it. As long as the pedals aren’t falling off the pedalboard, the Velcro is serving its purpose. With that said, there are some standard practices. You’ll need to follow the standard and stick to it to have the results you want Velcro to have.
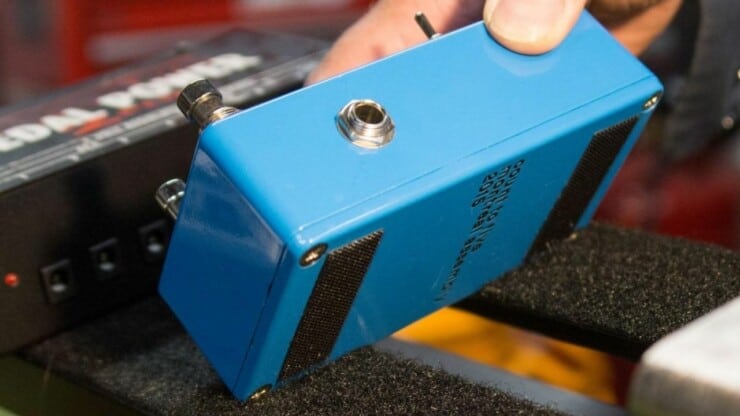
For most people, the hook side of the Velcro needs to go first. Then, you should keep the loop side of the fastener/fuzzy side reserved for the board. It’s unofficially recommended because it makes sense. While this isn’t the only route to take, there are some reasons why the loop side is used on the board.
Aesthetics
The Velcro’s hook side normally grabs hold of everything, and it’ll make it blatantly visible on the top of the pedalboard. Normally, people prefer that their setup looks neat and a bit badass. To an extent, this will not be a concern. However, if you’re willing to spend a few hundred bucks on a pedalboard, why not show it off? You’re going to want to give the pedalboard a decent presentation. That is, of course, unless you don’t mind displaying carpet fuzz, animal fur, dryer lint, or even hair on the Velcro.
Structural integrity
When talking about the loop side of the adhesive, you can simply run over the stuff with a steamroller. It’ll still function seamlessly as long as the hooks are not damaged or mangled. In the case of the hook side of the pedalboard, it’ll be wide open to being stomped on, scuffed, stepped on, and having things dropped on. Meanwhile, the dirt and grime will make adhesion difficult once it gets to a certain level.
Customization
By keeping the loop side dedicated to the pedalboard, it’ll allow for greater flexibility. Say that you find a sweet section of shag carpet that you want to plaster all over the board, hooks on the pedal would still work with that.
Consistency
Most of the pedals that people sell or trade come with the hook side on the pedal. However, every now and then you could run into a pedal with the fuzz.
Not to mention, if you’re a big fan of pedals and effects, you wouldn’t have to peel or strip the fuzzy looped side of the Velcro off the pedal. You should be mindful of how like-minded pedal hoarding musicians.
Moreover, you should be aware that someday you can possibly fall out of love with your beloved pedals. Tastes, feelings, and preferences can often change over time. Things like this happen. When they do, you’ll probably want to trade up or sell the pedal on the quest for getting the ideal tone.
If the music world as a collective is all on the same page and everyone can agree that the hook side will belong on the pedal, such that when a new individual trades pedals with you and realizes that there is one less thing to worry about, think of how much good in the world it would bring.
Moreover, it’ll make things easier and there wouldn’t be confusion over which side of the Velcro goes on the pedalboard. There hasn’t ever been an official rule over which side of the Velcro goes first. People have simply left it to the subjectivity to decide which side of the Velcro goes on the pedalboard first.
Instead of debating about which side goes first, why not be a part of the solution? A mainstream musician needs to step ahead and start a revolution! Someone needs to select one side, and the entire music community should follow that side of the Velcro going first.
Is Velcro the only way of mounting pedals to the board?
While Velcro is the easiest and most common method to mount pedals to the pedalboard, there are ways too. Some methods are more effective than others. Ultimately, it’ll come down to who you are as a musician and what you’re planning on doing with the pedals. Are you planning on rotating in and out depending on your needs? If so, Velcro is definitely the best way of going forward.
However, if you’re the sort of guitarist who is set in their ways and isn’t planning on changing the configuration any time soon, then there are some viable options worth looking at. Some of them would be – Zip ties, Pedal links, Proprietary mounting kits, and liquid nails (although they aren’t recommended).
Zip ties
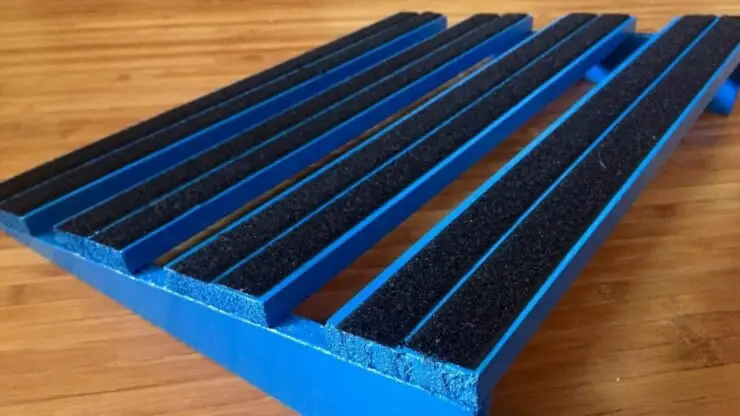
Many pedalboard systems by certain brands take a unique approach from the rails-based pedalboard systems. They tend to come with holes, which allow you to use zip ties or twine for securing the pedals. This will be a great option for not just static, but dynamic setups as well.
Pedal links
Although this isn’t the most popular idea, someone circulated it around and innovative people made careers out of it. This method is actually very slick, especially when you’re taking the link out of a bike chain and converting it into a pedal mount. Generally, most effect pedals come with a housing screw on the underside of each corner of the pedal. You will need to turn the effects pedal upside down and then remove the screws. Then, you should utilize the existing hardware and thread the screw through the eyelets of the pedal link.
After that, re-fasten the hardware screw into the underside of the pedal. Then, it would help if you mounted the other side of the pedal link to the board. This solution will be great for pedalboards that you aren’t planning on changing anytime in the near future.
Key tips to utilize for painless pedalboard building
Whether you’re creating your DIY pedalboard, starting from scratch, or re-working the layout, building pedalboards is often a regular part of a guitarist’s life. Sometimes, the process to build a pedalboard can be full of frustrating and head-scratching moments.
However, there are certain tips that you can use to ensure that your pedalboard-building time goes off without a hiccup. Most of the tips will assume that you have a pedalboard with several pedals with you. Using these tips will go a long way in ensuring that your pedalboard is in prime condition.
Blank slate
If you’re starting from scratch, you’ll need to have a leg up on this one. However, if you’re reworking the pedalboard, it’ll be a great idea to take everything down. Then, you should start off with an empty pedalboard. You shouldn’t even leave any cables, pedals, or power supplies on the board. You need to… Start Over.
Draw things out
A simple yet useful idea would be to draw a diagram for plotting where cables, pedals, and power supplies get placed on the pedalboard. You can take things one step further and cut out the pieces of paper measured to be the same size as the pedals. This will present a rough visual of how much space the pedals are taking up. It’ll also help you maximize the space on the board. If you aren’t willing to go through this much trouble, you can head over to the next tip.
Cover the Velcro
Whether you’re using Velcro or Dual Lock, it can be painful to constantly remove pedals from the pedalboard. You can fix this issue by simply covering your Velcro with thin cardboard or sheets of paper. The smooth surface will make for easy movement and placement and you won’t need any excessive force.
Track the progress
It’s important to track the progress in some way as you’re bringing rigs (bass, guitar, and pro audio). If you have a smartphone with a high-quality camera, you can use it to click photos of how you’re progressing. This will come in handy if you need to troubleshoot in the future. If you’ve already drawn out your rig, this will be great too. It wouldn’t be a bad idea to know where you started out on the pedalboard.
Power will be important
Up until now, these were all practical tips. However, this is one of the mistakes that many guitarists make when you’re setting up the pedalboard. Proper power will make a difference and help you get the pedals working correctly. Moreover, it’ll sound great, too.
Take time to look how exactly how much power the pedals need for operating. This is normally noted in milliamps, abbreviated ‘mA’, and found in the User Manual or on the pedal’s official website. You’d be surprised to find out that you had been using an underpowered power supply until now. It’s possible that you might have to spend a decent amount of money at this stage. However, you can be assured that this will be a worthwhile investment and give premium results for years to come.
Cables of different sizes
Thanks to the numerous solder-less kits available, it has become easier than ever to make your patch cables. However, if you prefer soldered cables or don’t know how to solder your own cables properly, you can take the time to plot the pedals. Then, you should measure the length from the Output to the Input. After that, go around and shop for cables. It’ll be a great idea to account for slack in the cables as well. Once you have the lengths figured out, you can choose from the number of options available.
Conclusion
Thank you for reading. Hopefully, now you know more about pedalboards, in pedalboard Velcro which side goes first, which side of Velcro on pedalboard will give better results, and a lot more. Putting the pedals on the pedalboard will be important, especially when you consider the confusion surrounding which side goes first. Interestingly, when you’re sticking pedals to the pedalboard using Velcro, the side that goes first doesn’t really matter. It’s your pedalboard and you get to decide which side goes first. Ultimately, you can go with any side as long as the pedals aren’t falling off the pedalboard.
Image Credit:
Featured Image: Aclam Guitars

