
When you’re learning the guitar, you may want to move past simple strumming techniques. Fingerpicking can make what you play sound more interesting, and it’s very important to know how to fingerpick for certain styles of music, such as folk. If you’ve wondered how to learn fingerpicking guitar, the good news is, the basics are not that hard. After that, you just need to put in the hours of practice to get your fingers used to the motions.
What Exactly Is Fingerpicking?
Fingerpicking is using the fingers on your strumming hand to pluck the strings while you hold down a chord with your other hand. In this style, you don’t use a pick at all. Fingerpicking involves learning certain patterns, ones that move you across the strings in set ways. Once you learn the patterns, you can start committing them to muscle memory.
What Do I Need to Know to Get Started?
Learn the Labels for the Strings.
You likely already know the notes for the strings. If you don’t, the strings are E (lowest and biggest), A, D, G, B, and E. However, when you’re fingerpicking, it’s easier to know the strings by their numbers from highest to lowest. The strings are:
E-1
B-2
G-3
D-4
A-5
E-6
They are often just referred to by their numbers, not their letters. You’ll need to know these numbers to make the patterns easier to learn.
Learn the Labels for Your Fingers.
While not all fingerpicking techniques use letter labels for your fingers, they’re still helpful to know. You’ll likely run across them at some point. With these labels, your thumb is “p” – these letters might not make sense to you because they’re derived from Spanish words. Your index finger is “i”, while your middle finger is “m” and your ring finger is “a.” These labels are used for your fingerpicking hand, not your fretboard hand. You don’t need a label for your pinkie, as you usually don’t use it.
Figure Out How to Read a Tab.

Fingerpicking patterns are often written in tabs, which can look a little confusing at first. When looking at a tab, it’s like looking at your guitar as if you’ve tipped the bottom of the guitar up to lay it flat in your lap. The bottom line on a tab is the lowest string, and the strings go up from there. On the strings, you’ll see numbers. These numbers represent the fret the string should be played on. Often, they’ll be a chord at the top of each measure in the tab. That means you don’t have to worry too much about what fret to play on, as your fingers will already be there if you’re playing the correct chord.
Playing Basic Fingerpicking Patterns
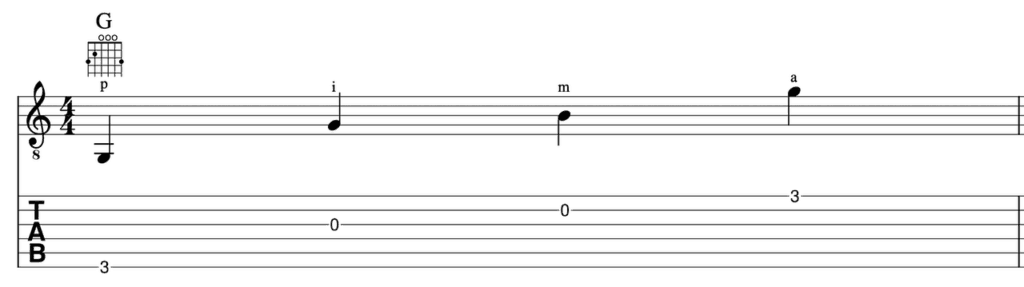
Start by picking a chord. When you first start playing, pick one where you would normally strum all the strings, such as G. Then you don’t have to worry about which pattern will work best. You can just work on them all.
p6-i3-m2-a1
Okay, that might look like an indecipherable code. Just take a deep breath and think about what you’ve learned so far. The letters refer to your fingers, and the numbers refer to the strings. So, in this case, you’ll play the first string, the E6 string with your thumb. Then, you’ll pluck the third string, the G3 string, with your index finger, followed by playing the second string, the B2 string, with your middle finger. Finally, pluck the first string, the E1, with your ring finger. Then, return to the top. Practice going through these slowly, keeping a steady beat. Make sure each string is sounding clearly. Don’t focus on speed right now. Work on keeping it slow and steady.
You can also reverse this pattern. Try it backward now – a1-m2-i3-p6. Work on playing it this direction, going slowly. Then, work down the strings and back up the strings.
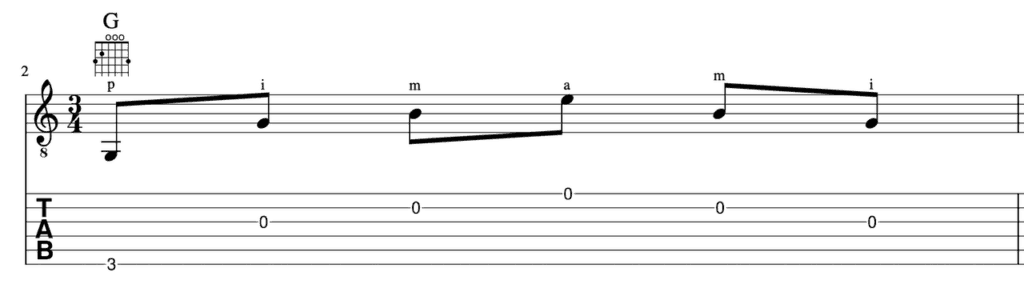
p6-i3-m2-a1-m2-i3
If this pattern looks similar to the last one, that’s because it is. It’s not a straight reversal, though. If you notice, you don’t pluck the E1 string twice. You just hit it once then start moving back up the strings. You also don’t pluck the top string twice. This picking style is good for music that has beats grouped in threes, such as 3/4 time, rather than in fours, such as 4/4 time.
Change Patterns According to the Chord
When reading tab for guitar, you might change chords every measure, and as you do, you’ll also change up the pattern. Typically, though, you’ll just need to move where you play the bass note. That’s because you don’t play the lowest strings on some open chords, even when strumming, so you don’t want to pluck those for your bass line. As you’re playing tab, remember to look for where the bass note should be plucked so you can move around as needed.
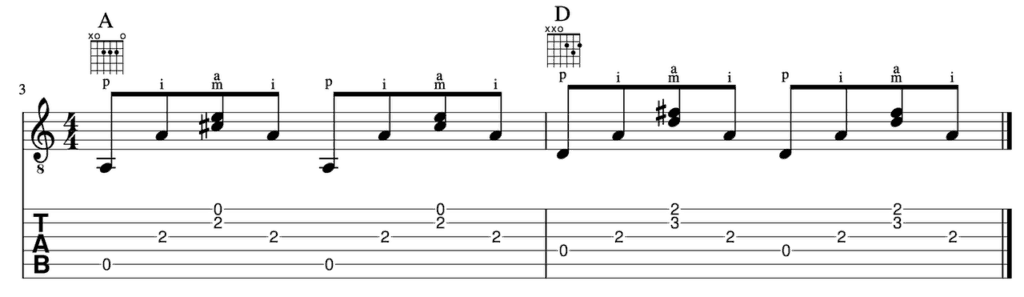
For instance, take this pattern that you play on the A chord: p5, i3, m2/a1, i3, p5, i3, m2/a1, i3. You’re playing the A5 string with your thumb and the G3 string with your index finger. At the same time, you’ll play the B2 and E1 strings with your middle finger and ring finger, then keep going through the pattern. However, when you move to the D chord, where you don’t play the lowest two strings, the pattern changes to p4, i3, m2/a1, i3, p4, i3, m2/a1, i3. You play it almost the same, except move the thumb note to the D4 string.
Learning to fingerpick on the guitar can be a lot of fun. You can use it to create certain sounds and styles of music, including genres like folk and rock. You’ve probably noticed some of your favorite songs are fingerpicked, and if you can figure out the pattern, you can learn to play them yourself. Just remember, it will take a little while for you to commit the movements to muscle memory. Go slowly and focus on building good technique, and over time, you’ll naturally pick up speed.

